Showing posts with label SQL Server. Show all posts

Saturday, June 16, 2012

SQL Server Pivot Function

In previous post we discussed exporting data from SQL Server into an excel file and how you can pivot the data etc. Pivoting is basically a way for you to convert rows into columns. Starting with 2005, SQL Server introduced PIVOT function which allows you to retrieve columns in tabular format. PIVOT function doesn't work on certain data types such as XML.

In the past, suppose you wanted to group employees by the city they reside in. You can use Group By clause to get the count of the number of employees by city, but such a query will result in each city as one row and you will have to do something extra to convert them into columns. The query below will return the number of employees that reside in three cities with the count for each city appearing in one row.

USE AdventureWorks
GO

SELECT City,COUNT(*) AS [Count] FROM HumanResources.vEmployee 
WHERE City IN ('Monroe','Redmond','Seattle')
Group By City

The result will look like this

CityCount
Monroe14
Redmond21
Seattle44

Suppose you want to pivot this data so that each city appears as a column. You can modify the above query and use PIVOT function.

Use AdventureWorks
GO
SELECT [Monroe],[Redmond],[Seattle]
FROM
(
    SELECT E.City FROM HumanResources.VEmployee E
) C
PIVOT
( 
 COUNT (City)
 FOR City
 IN ([Monroe],[Redmond],[Seattle])
 ) AS PivotTable;

Now the result will look like this
MonroeRedmondSeattle
142144

You may be wondering about missing WHERE clause. Basically FOR City IN () under PIVOT function takes care of filtering your data based on your criteria. This query works but the nested query still returns all rows. You can add a WHERE clause in your nested query to only return rows that satisfy your criteria. Above query can be rewritten as follows...
Use AdventureWorks
GO
SELECT [Monroe],[Redmond],[Seattle]
FROM
(
    SELECT E.City FROM HumanResources.VEmployee E
    WHERE City IN ('Monroe','Redmond','Seattle')
) C
PIVOT
( 
 COUNT (City)
 FOR City
 IN ([Monroe],[Redmond],[Seattle])
 ) AS PivotTable;

PIVOT is a useful function but not very intuitive, as you can see above, it takes a minute to make sense of it. Question for you guys - have you used PIVOT function before and if so, how did you use it?

Thank you.

Saturday, June 2, 2012

Creating a Composite Foreign Key

In previous post we discussed various types of primary keys such as natural key, surrogate key and composite key. To recap, a composite primary key is a combination of more than one columns. Ordinarily a single column primary key is preferable but there are situation as we discussed previously when it makes sense to create a composite primary key.

Naturally, if you want to use composite primary key as a foreign key in other tables, you will have to create the columns in the secondary table that corresponds to the primary table. For example, you have a table called Customers and you have a composite primary key "FirstName, LastName" in this table. To use this key as a foreign key in another table say "CustomerAddresses" you will have to create the FirstName and LastName columns in CustomerAddresses table and then add the referential integrity. (I am not saying this is a good way to design your table schema, this is just an example).

Below is the script that you can run to create a foreign key in CustomerAddresses table.
ALTER TABLE dbo.CustomerAddresses
   ADD CONSTRAINT FK_Customer
   FOREIGN KEY(FirstName, LastName)
   REFERENCES dbo.Customers(FirstName, LastName)


You can use the same script to create foreign key constraint on any other columns. For example, if your Customers table has "CustomerID" as primary key, then you would add "CustomerID" column in CustomerAddresses table and then use the script above replacing "FirstName, LastName" with "CustomerID".

Thank you.

Saturday, April 7, 2012

Configuring SQL Server Maintenance Plan

I may not have explicitly mentioned earlier, but all the examples, and the content that I write generally applies to SQL Server 2008. In most cases it will be true for SQL Server 2005 as well, but not always. For example, in one of the blog about compressing data during backup, I discussed "WITH COMPRESSION" command to use during backup. This command was only introduced with SQL Server 2008.

Today, we will review another facility available in SQL 2008 (also available in SQL 2005, but some of the features may not be the same) called Maintenance Plan. Maintenance Plan allows you to setup certain maintenance tasks by using SQL Management Studio with ease. This comes specially handy when you have multiple databases on the same server and need to setup maintenance plan such as nightly backup for all the databases at once.

1. Connect to your SQL instance via Management Studio and go to Management > Maintenance Plans.


2. Right click on Maintenance Plan and either select New Maintenance Plan or Maintenance Plan Wizard. Maintenance Plan Wizard is quite powerful and walks you through selecting available maintenance plans and configure it. In this example, we will use the first option and setup our own maintenance plan. Select "New Maintenance Plan" and name your plan appropriately, which will open design surface and a list of available maintenance plan.


3. Drag one or more tasks that you want to configure in this maintenance plan. We will configure two tasks - database backup and check database integrity task.

Check Database Integrity
It is often a good idea to check the database integrity immediately before or after the backup.
Drag the task on the design surface and then right click > Edit to configure your databases. The resulting UI will allow you to select one or more databases. You can also check all databases (this is helpful if you are going to add databases in future and don't want to keep adding new databases to this list, alternatively if you have too many databases, you may want to configure few databases in one task).


Check the "Ignore databases where state is not online" to only perform integrity check when database is online. Click on OK to save the change. 

From the design surface top menu, click on the calendar icon to setup the schedule for this task. Name your schedule and setup appropriate schedule. Clock on OK to save and close the schedule window. 


Configure Database Backup
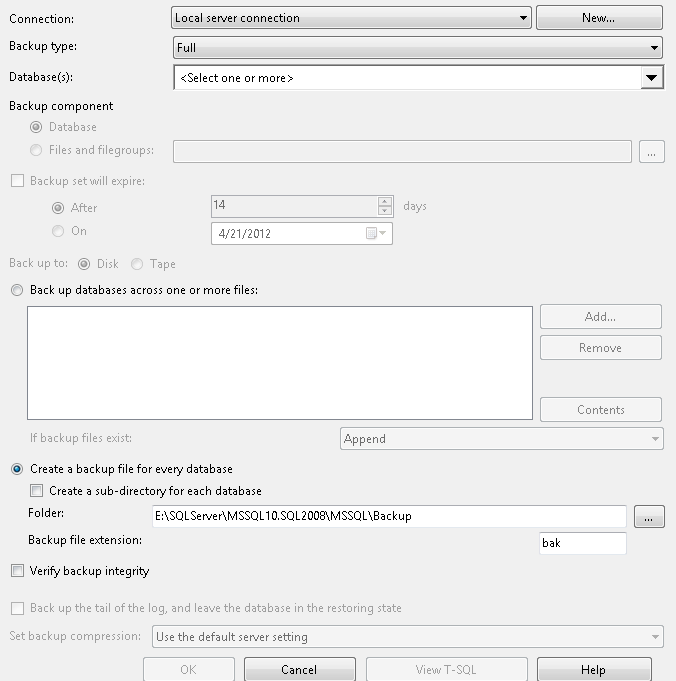
Repeat the same steps and drag the database backup task and configure it. Again right click on the task and configure your options. Here you can configure whether you want full, differential or transaction log backup, select one or more databases and define the location where you want to save the backup files. There is also an option called "Verify Backup Integrity" this shouldn't be confused with Database Integrity task which we configure in above step.


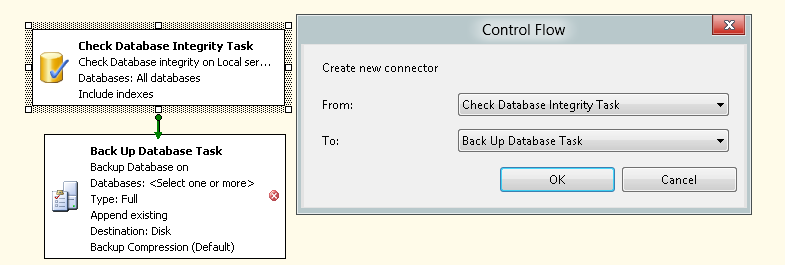
In this example, we want to ensure the integrity check is performed first before the database backup. Right click on either of the two task and select "Add Precedence Constraint" from the context menu and select the precedence you want.


That's all there is to it. Once you save your plan, SQL Server will automatically create a SQL Agent job to run your plan at the scheduled time.

If I had database mail setup, I can also add a third task "Notify Operator Task" as the last step which can send a notification email in the event of the task failure. See my previous post to learn about configure your SQL Server to send emails.

Thank you.


Wednesday, February 29, 2012

Using Cursors in SQL Server


Cursors are generally not recommended and are slower compared to other methods of reading data. But there are situations where you must use cursors. I have found them to be useful when I am trying to run a SELECT on a table in Query Analyzer and performance is not a concern.

For example, consider a Stores table that has one to many relationship with another table called StoreHours. The store closes at different time depending on weekday. Also stores close at different times in different regions. You need to run a query to determine the latest closing time for each store. You can easily achieve this by running a cursor.

As I mentioned earlier, cursors are rather slow, but you can increase their performance using FAST_FORWARD and READ_ONLY hints. Also remember to always deallocate and close cursor when done.

Let's use the cursor to select latest closing time for each store, insert them into a temporary table and then select the records from the temp table.

DECLARE @tmpStoreClosing(StoreID INT, ClosingTime DateTime)
DECLARE @StoreID INT
DECLARE curStore CURSOR FAST_FORWARD READ_ONLY FOR
    SELECT StoreID FROM Stores
OPEN curStore
FETCH NEXT FROM curStore INTO @StoreID
WHILE @@FETCH_STATUS=0
    BEGIN
         INSERT INTO @tmpStoreClosing(StoreID,ClosingTime)
         SELECT TOP 1 @StoreID,ClosingTime FROM StoreHours 
         WHERE StoreID=@StoreID ORDER BY ClosingTime DESC
         FETCH NEXT FROM curStore INTO @StoreID
    END
CLOSE curStore
DEALLOCATE curStore

SELECT StoreID,ClosingTime FROM @tmpStoreClosing

You can also improve the performance using INSENSITIVE or STATIC keyword. When this keyword is used, cursor copies the data into tempDB and runs the select from there. The drawback of this approach is that any changes made to the data are not reflected.

FAST_FORWARD is same as FORWARD_ONLY and READ_ONLY combined. Data can only be read and in forward only manner. When using this flag, you can only use FETCH NEXT.

There are ways to achieve the same thing using a WHILE loop, which doesn't have the drawbacks of a cursor. We will discuss using a WHILE loop to achieve the same objective in future post.

Cursors should be avoided and if used they should be used primarily for reading the data in forward only manner.

Thank you.


Saturday, February 25, 2012

SQL Server Isolation Levels

                                                                    SQL Server Locks - Part IPart II, Part III, Part IV

In previous two posts we have been discussing SQL Server locking mechanism and how deadlocks can occur. Today we will talk about Isolation Levels. Different Isolation levels allow for various levels of concurrent operations that can be performed on the same data.

Isolation is the level to which one operation / transaction should be isolated from the other operation.

Serialization is an important concept in database management systems. The serialization allows concurrent transactions to run one after another serially. For example, if one transaction is running a read operation on a set of data, and another concurrent operation is running an update on the same data, both operations will be serialized in order the requests were received by the database management engine. For example, if read operation was requested first, a shared lock will be issued to this transaction and any other update/delete operations will be blocked or queued. Once the read operation is complete, an update lock will be issued to the update operation next in line which will read the data and then receive an exclusive lock to update the data.

But what if you don't really need this level of isolation? For example, you want to read the data even though the data may be exclusively locked by another transaction? You can achieve this by using a lower level transaction or by using locking hints (we will discuss locking hints in future post).

There are following types of isolation levels according to SQL-92 specifications.

Read Uncommitted - This is the lowest level of isolation. In this level, transactions are isolated only enough to ensure that corrupt data is not read. This level allows dirty reads, i.e. the data not yet committed.

Read Committed - This is the default level. Only committed data will be read. When a transaction has an exclusive lock, all other transactions requesting shared lock will be blocked

Repeatable Read - Repeatable read locks all the rows that it touches unlike read committed. Let's explain this with an example.

Let's say you are running a cursor where you are fetching one row at a time and then adding them to a temporary table (see below)

    DECLARE @tmpTable TABLE (FirstName varchar(50), LastName varchar(50),
                                                            Address varchar(255)

    DECLARE @customerID INT
    DECLARE CURSOR curCustomer READ_ONLY FOR
    SELECT CustomerID FROM Customers
    OPEN curCustomer
    FETCH NEXT FROM curCustomer INTO @customerID
    WHILE @@FETCH_STATUS=0
          BEGIN
              INSERT INTO @tmpTable(FirstName,LastName,Address)
              SELECT FirstName,LastName,Address FROM Customers
              WHERE   CustomerID=@customerID
              FETCH NEXT FROM curCustomer INTO @customerID
          END
    CLOSE curCustomer
    DEALLOCATE curCustomer

If you run this transaction at read committed level, only one row will be locked for reading at a time and then the lock will be released. Imagine you read the first row where address was "123, Roswell Road, Atlanta, GA, 30330" and insert this row in tmpTable. Now you lock the second row to read and insert into @tmpTable. Now imagine another concurrent transaction locked the first row and updated the address to "567, Peachtree Road, Atlanta, GA 30101". The record in your temp table is now incorrect.

If you run this transaction under repeatable read, this isolation level will lock the 1st row and then the second row and then the third row and so on, but will not release any lock until the entire transaction is complete. This ensures that the data read cannot be updated while the transaction is still running. While this promotes better data integrity, concurrency suffers because all other transactions must now wait for the resources to be released, resulting in timeouts.

Although repeatable read prevents data integrity, phantom inserts/updates/deletes are still possible. If one transaction reads the data more than once, then the rows are locked as they are read first time and will then be released. But, before the data is read second time, another transaction may insert a new row or update/delete rows that were read previously, resulting in phantom data.  

Serialization Level - Serialization level works by using key range locks. Using the same example as above, when this isolation is read, entire key range (in this case entire table since we are reading all records in customer table) will be locked until the entire transaction completes, which will prevent phantom rows since the other transactions must wait until this transaction ends. Serialization is the highest isolation level and while it promotes data integrity, it reduces concurrency. To know more about key range locks, refer back to my post about SQL Server Locks.

In addition to these isolation levels, SQL Server supports two additional isolation levels.

READ_COMMITTED_SNAPSHOT - This isolation level uses row versioning instead of shared lock when reading the data. Read operations only require SCH-S table level locks (i.e. to prevent DDL modifications) but no page or row level locks are needed. When reading rows modifed by another transaction, only the version of the row that existed when the transaction started is read. This only works when another isolation level "ALLOW_SNAPSHOT_ISOLATION" option is ON. 

You can set isolation level by using the following syntax...

    SET TRANSACTION ISOLATION LEVEL
    {
        READ UNCOMMITTED | READ COMMITTED | REPEATABLE READ
        | SNAPSHOT |  SERIALIZABLE
     }
For Example,

    SET TRANSACTION ISOLATION LEVEL REPEATABLE READ;
    GO
    DECLARE @tmpTable TABLE (FirstName varchar(50), LastName varchar(50),
                                                           Address varchar(255)

    DECLARE @customerID INT
    DECLARE CURSOR curCustomer READ_ONLY FOR
    SELECT CustomerID FROM Customers
    OPEN curCustomer
    FETCH NEXT FROM curCustomer INTO @customerID
    WHILE @@FETCH_STATUS=0
          BEGIN
              INSERT INTO @tmpTable(FirstName,LastName,Address)
              SELECT FirstName,LastName,Address FROM Customers
              WHERE CustomerID=@customerID
              FETCH NEXT FROM curCustomer INTO @customerID
          END
    CLOSE curCustomer
    DEALLOCATE curCustomer
    GO

You can set ALLOW_SNAPSHOT_ISOLATION and READ_COMMITTED_SNAPSHOT option at the database level by using the following script...
    ALTER DATABASE <DBName>
    SET
    {
      ALLOW SNAPSHOT_ISOLATION {ON | OFF}
       | READ_COMMITTED_SNAPSHOT {ON | OFF}
    }

Hopefully this post will help you determine the best isolation environment if you must change it. Although, SQL Server defaults work in most cases.

Thank you!

Thursday, February 16, 2012

Database Mail - Send Emails from SQL Server

Today, we will discuss how to configure and send emails using SQL Server 2008. Although the setup process is more or less same in both SQL 2005 and SQL 2008. Prior to SQL Server 2005, the database mail was called SQL Mail and lacked a few features that Microsoft introduced in database Mail.

Before you can send emails using SQL Server, you must first create a profile to use when sending emails. Below are step by step instructions on configuring database mail using management studio.

1. Expand Management and right click on Database Mail

2. Click on Next


3. Select the first option "Set up Database Mail by performing the following tasks".


4. Enter a profile name and click on Add. Note, since you won't have a profile setup, you will see the screen in step 5 below.


5. This is where you will enter the SMTP server information. In theory, if you are running IIS on the Database Server, you can configure IIS - SMTP Mail (IIS 7.x no longer have this feature, although there are still ways to configure it for now, but I expect this to go away soon). Whether you should run IIS on database server or not is a whole another argument.

Alternatively, you can configure SMTP server on another machine in your network and use it to send emails from both SQL Server via database mail and also from other applications.


6. Click on OK and click on Next, which will show you the following screen. You can leave defaults in most cases, but you can change the file attachments that you want to prohibit here.


7. Click on Next and click on Finish. Now Database mail is configured and ready to be used. You can right click on Database Mail again and click on Send Test Email to send a test email.

Before you send test email, make sure SQL Server is configured to send emails. Run the following script.


sp_CONFIGURE 'Show Advanced', 1
GO
RECONFIGURE
GO
sp_CONFIGURE 'Database Mail XPs',1
GO
RECONFIGURE
GO


Before you can use the database mail to send emails or alerts from SQL Agent jobs, you need to add operators.

8. Right click on Operators from the Management Studio.

9. Setup one or more Email Operators


10. Now you are ready to configure a SQL agent job to send an alert or a notification email based on an action.  I will not go through creating a SQL agent job in this post, but let's assume you have a job that you want to send you an alert or an email when it fails. First, we will configure an alert. Right click the job and click on properties. Click on Alerts.


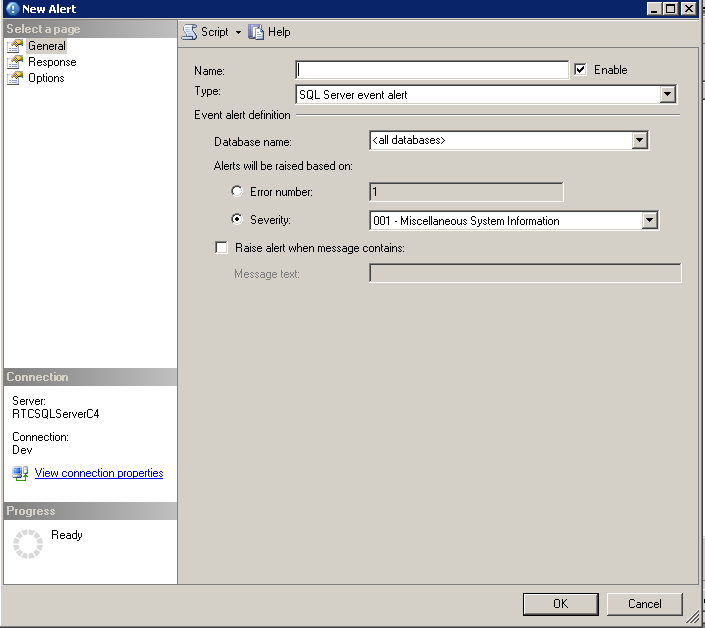
11. You can pick an operator that you created below and the type of alert you want to send. Response and Options allows you to configure additional options.


12. Now lets setup Notification. Click on OK from the Alerts screen to go back to the main screen and click on Notifications. Here you should be able to select the email or page that you want to send and the condition along with the operator you want to send it to.

Click on OK, and you have configured database mail to work with your SQL agent job.

You can also use "sp_send_dbmail" to send an email using SQL script

USE msdb
GO
EXEC sp_send_dbmail @profile_name='YourProfile', @recipients='youremail@email.com',
@subject='Test',@Body='Test Email'

SQL Server stores emails in the following system tables in msdb database. You can run select statements on these tables to check if an email has been successfully processed or failed.

sysmail_allitems, sysmail_sentitems, sysmail_unsentitems, sysmail_faileditems.

sysmail_mailitems has the initial emails and when an email is sent or failed, the sent_status flag is updated and also the email is copied into the appropriate table.

You can also check the log of all the emails in sysmail_log table.

Database Mail is a powerful feature and you can use it to ensure you are getting notified when a critical job didn't execute as it should have.

As always, your comments are welcome.

Monday, February 13, 2012

Clustered vs. Non-Clustered Index

All About SQL!
The other day someone asked me a question about the difference between clustered and non-clustered indexes in SQL Server and why can you only have one clustered index in a table? It is one of those things that you know but often find it difficult to explain in a non-technical manner, at least that's how I felt. So, what is the difference and why can you only have one clustered index?
Clustered Index: Clustered index sort the data physically in the data table according to the keys in the clustered index. Basically all the data rows are physically sorted according to the clustered index. Since you can only sort data rows one way, there can only be one clustered index. The lowest level of clustered index are the data rows themselves. If you have a primary key defined in the table, then SQL Server automatically creates a clustered index on the primary key.
You don't have to have clustered index and the table without a clustered index stores the data on a heap. Data inserted in this table will return in the same order it was inserted in, unless you apply ORDER BY clause to your query which is SLOW!!!
Non-Clustered Index: A Non-Clustered index on the other hand is stored independently of the data rows' physical order. Think of this as a logical order of the data rows and hence there can be more than one non-clustered index. Non-clustered index's lowest level contains the keys used in the index and are a pointer to the actual data rows containing that key. This pointer is called a row location and its structure depend on whether the table has a clustered index or not. As mentioned earlier, if a table does not have a clustered index, the data rows are stored in a heap and in this case the row locator is simply a pointer to the row. For tables that do have a clustered index, the row locator is the key of the clustered index.
Both clustered and non-clustered indexes can be unique. Primary key by default is a unique index whether it is defined as a clustered or non-clustered index. Unique indexes ensure that no two rows can contain the same keys used in the unique index.
IGNORE_DUP_KEY: When creating a unique index, you can also use "IGNORE_DUP_KEY" hint. When a duplicate key is inserted, if IGNORE_DUP_KEY was specified, SQL will issue a warning and ignore the duplicate row, but if it was not specified, SQL server will issue an error message and roll back the entire insert. IGNORE_DUP_KEY is only allowed when you create a UNIQUE clustered or a non-clustered index.
FILL FACTOR: A Fill Factor defines how densely the index will be packed when it is created. If you are going to have many inserts and updates, you should use a lower fill factor to leave room for new data, which reduces the number of page splits that may occur when data is inserted. The space doesn't change when data is inserted or updated, only when index is created, so it is recommended to rebuild indexes periodically. If the table is rather static, create an index with a high fill-factor.
Indexes generally speed up the retrieval, update and deletion but often slow down inserts because every new record will have to be added to the index. Care should be taken in creating the number of indexes on a table, especially when data is frequently inserted.
While you can create some indexes during database design, often time it is not possible to know the table usage until it is out in the field. Once the database is out in the field and you want to optimize certain heavily used tables, you can do the following
  • In SQL Management Studio (SQL 2005 or SQL 2008) go to Tools > SQL Profiler and run the trace for the tables that are heavily used.
  • Collect some metrics and save the file.
  • Go to Tools > Database Engine Tuning Advisor and load the workload file, select the database and start analysis.
  • Review the recommendations and apply them to the appropriate tables.
I have generally found the tuning advisor to be a good tool, but be careful in applying all its recommendations. As always, do this in staging environment first, before applying to your production database.
As always, your comments are welcome and feel free to correct me if I made any mistake!

Benefits of Database Indexing

All About SQL!
In my previous Post I talked about various types of indexes you can create in SQL Server. Today we will discuss the benefits of Indexing and why you should have at least a clustered index in every table.
Every database system offers some kind of indexing that allows for sublinear time lookup for increased performance as opposed to linear search which is highly inefficient. For example, if a table is un-indexed, database engine will examine each record to find the searched record, resulting in approximately half the data rows being scanned on an average. Further, if the searched record doesn't exist, all the data rows will be scanned before a match not found result is returned. Indexing allows for faster searches resulting in improved performance.
Indexing however is a double edged sword. While more indexes generally will result in faster data retrieval from a table, but the more indexes you have, the longer it will take to insert new data in the table.
Depending on your table definition, some indexes are automatically created by the SQL Server. For example, to enforce a UNIQUE constraint. You can create other indexes either via CREATE INDEX statement or by using SQL Management Studio.
Below are some of the guidelines you can use when creating indexes. This is not an exhaustive list and may not be suitable in all situations, so use this as a general guideline.
1. When creating an index, choose the right data type. Certain data types are more suitable for indexing than others. Integer data types (INT, BIGINT, SMALLINT, TINYINT) are good candidates for indexing because of their specific size and are easy to compare and perform other mathematical operation. CHAR, VARCHAR etc. on the other hand are much less inefficient.
2. Make sure that indexes are actually used. I have often seen database schema where indexes were created in advance but any of the data retrieval operations don't use the keys that are indexed.
3. Also keep in mind when a retrieval query applies a SQL function to the keys that are part of the index, the indexed value is not used in the query. For example, you convert a date column which is part of the cluster to a string while retrieving the data. In this case, the index won't be used in the retrieval process.
4. If you create an index with multiple columns, pay attention to the order of the columns. Data is stored in order the columns are used in the index. The column with less unique data should be used first and so on.
5. Remember each non-clustered index column is a pointer to the clustered index columns (assuming clustered index exists in the table). Hence, care should be taken in selecting the number of columns used in the clustered index. For the same reason, try to avoid or limit using the columns that are frequently updated in a clustered index.
6. Be extra careful when rebuilding a clustered index. I have seen it many times where someone has created a SQL job to drop a clustered index and then used the "CREATE INDEX" command to recreate the index. When you drop a clustered index and then recreate it, you end up rebuilding non-clustered indexes multiple times. To avoid this, use DROP_EXISTING clause along with CREATE INDEX which will rebuild non-clustered indexes only once.
As explained in previous Post, use Fill Factor wisely.
I realize this is a long post but I wanted to keep all the crucial points in one blog to make it easier to read. As always your comments are appreciated and please don't hesitate to add other points I may have missed or let me know if I missed anything.