Showing posts with label Database Performance. Show all posts

Saturday, April 7, 2012

Configuring SQL Server Maintenance Plan

I may not have explicitly mentioned earlier, but all the examples, and the content that I write generally applies to SQL Server 2008. In most cases it will be true for SQL Server 2005 as well, but not always. For example, in one of the blog about compressing data during backup, I discussed "WITH COMPRESSION" command to use during backup. This command was only introduced with SQL Server 2008.

Today, we will review another facility available in SQL 2008 (also available in SQL 2005, but some of the features may not be the same) called Maintenance Plan. Maintenance Plan allows you to setup certain maintenance tasks by using SQL Management Studio with ease. This comes specially handy when you have multiple databases on the same server and need to setup maintenance plan such as nightly backup for all the databases at once.

1. Connect to your SQL instance via Management Studio and go to Management > Maintenance Plans.


2. Right click on Maintenance Plan and either select New Maintenance Plan or Maintenance Plan Wizard. Maintenance Plan Wizard is quite powerful and walks you through selecting available maintenance plans and configure it. In this example, we will use the first option and setup our own maintenance plan. Select "New Maintenance Plan" and name your plan appropriately, which will open design surface and a list of available maintenance plan.


3. Drag one or more tasks that you want to configure in this maintenance plan. We will configure two tasks - database backup and check database integrity task.

Check Database Integrity
It is often a good idea to check the database integrity immediately before or after the backup.
Drag the task on the design surface and then right click > Edit to configure your databases. The resulting UI will allow you to select one or more databases. You can also check all databases (this is helpful if you are going to add databases in future and don't want to keep adding new databases to this list, alternatively if you have too many databases, you may want to configure few databases in one task).


Check the "Ignore databases where state is not online" to only perform integrity check when database is online. Click on OK to save the change. 

From the design surface top menu, click on the calendar icon to setup the schedule for this task. Name your schedule and setup appropriate schedule. Clock on OK to save and close the schedule window. 


Configure Database Backup
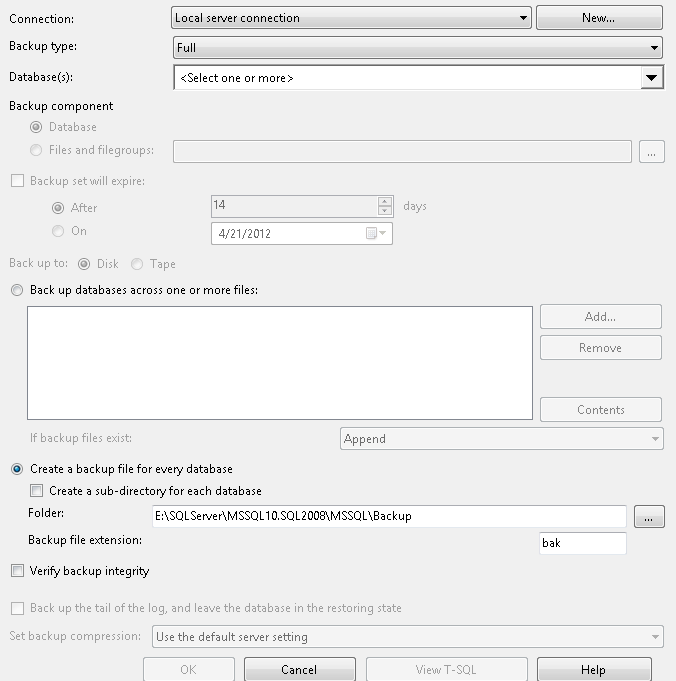
Repeat the same steps and drag the database backup task and configure it. Again right click on the task and configure your options. Here you can configure whether you want full, differential or transaction log backup, select one or more databases and define the location where you want to save the backup files. There is also an option called "Verify Backup Integrity" this shouldn't be confused with Database Integrity task which we configure in above step.


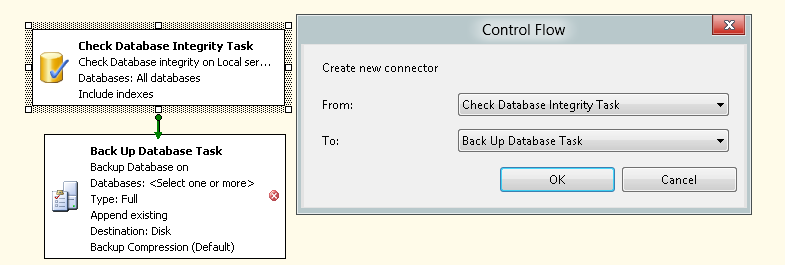
In this example, we want to ensure the integrity check is performed first before the database backup. Right click on either of the two task and select "Add Precedence Constraint" from the context menu and select the precedence you want.


That's all there is to it. Once you save your plan, SQL Server will automatically create a SQL Agent job to run your plan at the scheduled time.

If I had database mail setup, I can also add a third task "Notify Operator Task" as the last step which can send a notification email in the event of the task failure. See my previous post to learn about configure your SQL Server to send emails.

Thank you.


Wednesday, April 4, 2012

Database Normalization - Third Normal Form

In previous two posts we discussed First Normal Form and Second Normal Form. Today, we will discuss Third Normal Form.

Third Normal Form (3NF)
This rule breaks down the table structure a bit further. For a table to be in 3NF, it must also satisfy 1NF and 2NF. To make a 2NF table satisfy 3NF, remove the columns that don't fully depend on the primary key.

Imagine you have a payroll application which records the total hours an employee worked, the pay rate and total pay for the week. The following table schema can be used...

PayRoll

  • EmployeeID
  • WorkedDate
  • HoursWorked
  • PayRateID
  • Total
Let's see if this table satisfies 1NF and 2NF. There is no duplicate data in the same row. The Payroll table is associated to Employee table via EmployeeID and to PayRates via PayRateID. It has no redundant data, has a primary key (EmployeeID and WorkedDate), and foreign keys (EmployeeID and PayRateID). Thus, all conditions for 1NF and 2NF are satisfied.

What about 3NF? Is there any field here that doesn't depend on Primary Key? HoursWorked is fully dependent on EmployeeID and WorkedDate. Different Employees could work different number of hours on different dates. Also, PayrateID is fully dependent on Primary Key as well.

At first it may appear that PayrateID doesn't depend on WorkedDate but rather only on EmployeeID because an Employees' pay will be same day after day. But what if the Employee works on a holiday when they will be paid time and a half?

What about Total column? Total column is really HoursWorked * PayRate, hence it is a computed column and as such isn't fully dependent on primary key. For this table to be in 3NF, this column must be removed. So, where do you store this column? Actually no where. This is a computed column and you should compute it on the fly when retrieving the data.

As I mentioned in the first post about Normalization, the normalization goes up to 6NF and more normalization types may still be possible, but 3NF is generally the standard for most databases.

Thank you.


Monday, April 2, 2012

Database Normalization - Second Normal Form

In previous post we discussed the concept of Normalization and First Normal Form. Today, we will review Second Normal Form. You may want to refresh previous post before continuing on.

Second Normal Form (2NF)
2NF takes this concept  a bit further. This rule states that any data that is in multiple rows of the same table should be moved to a new table and the two tables should be joined via a foreign key. Basically, the idea is to reduce data redundancy by extracting redundant data and moving it elsewhere. Let's imagine you have a customers table that has the following columns

Customers
  • CustomerID
  • FirstName
  • LastName
  • Address
  • City
  • State
  • PostalCode
  • Country
Sure, you will have more than one customer from the same city, even more from the same state and definitely more from the same country. You may possibly have many customers from the same postal (zip) code. As you enter customers in this table, you are duplicating all this data i.e. City, State, PostalCode, Country etc. This table is not in 2NF. To make it 2NF compliant, create a new table and store City, State, PostalCode, Country. Let's call this table Addresses. This table has the following columns

Addresses
  • City
  • State
  • PostalCode
  • Country
What columns do you think could be redundant here? Sure PostalCode won't be, but what about City? A city could have multiple postal codes? Definitely a State can have multiple cities and Country will have multiple states. A good schema for all the tables may be the following...

Customers
  • CustomerID
  • StreetAddress
  • CityID
CityAddress
  • CityID
  • City
  • PostalCode
  • StateID
  • CountryID
States
  • StateID
  • State
Countries
  • CountryID
  • Country

Notice, one table resulted in 4 different tables. It is definitely more complex but more flexible. You can even pre-populate States and Countries in advance.

This schema also satisfies second rule of 2NF i.e. the related tables should be related by foreign key. CityID is a foreign key in Customers, StateID, CountryID are foreign keys in CityAddress table.

We will discuss 3NF in future post.

Thank you.

Friday, March 16, 2012

Query Execution - Determining CPU and I/O Usage

In previous post we discussed SQL Query Execution plan and how you can anlayze the execution plan, determine the steps that take the longest time to run and possibly optimize your query. We will take this process further and discuss disk access and CPU time and how you can analyze it.

As you already know, the data is stored on physical disks and every time you run a query, the data is either retrieved from the disk or saved to the disk. To reduce the read time from disk, SQL Server caches data. When data is read from the cache, it is called logical read; when it is read from the physical drive, it is physical read. Disk I/O operations are probably slowest of all operations and depend largely on the hard drive speed, latency etc.

So, how do you determine what resources are being used by your query and how you may be able to minimize the resource usage, increasing the performance.

SQL Server provides two commands "SET STATISTICS IO ON" and SET STATISTICS TIME ON" that you can turn on to determine the I/O and CPU usage when you run a query.

I recently downloaded and installed AdventureWorks database for SQL Server 2008 r2. You can download and install it in your test environment to test these examples. Here is the download link.

USE AdventureWorksDW
GO
SET STATISTICS IO ON
GO
SET STATISTICS TIME ON
GO
SELECT * FROM DimCustomer

When you turn on I/O and TIME statistics and execute the query like we did above, you will see something like this under messages tab

SQL Server parse and compile time: 
   CPU time = 0 ms, elapsed time = 0 ms.

(18484 row(s) affected)
Table 'DimCustomer'. Scan count 1, logical reads 1002, physical reads 0, read-ahead reads 0, lob logical reads 0, lob physical reads 0, lob read-ahead reads 0.

 SQL Server Execution Times:
   CPU time = 15 ms,  elapsed time = 951 ms.


This is my test bed with no load, but these numbers will be different in production environment and will vary depending on the load on the server.

Let's understand what these numbers mean...

1. SET STATISTICS TIME ON


There are two numbers here -

SQL Server Parse and Compile time:- These numbers tell us how much CPU time it took to parse your    query and compile it and also the time elapsed since your query started running. Stored Procedures are generally compiled and subsequent executions run the previously compiled version. As such, 1st run of a stored procedure will have some CPU time here, but subsequent runs should show CPU time = 0 or very negligible.

SQL Server Execution Times: - CPU time is the time it took for your query to execute and should be relatively constant, regardless of whether your server is busy or not. The elapsed time will change depending on the server load. If CPU time is really long, then you know you've got a problem and should be looking to fine tune the query.

2. SET STATISTICS IO ON
There are several bits of information here, some of which may be helpful if you are looking to fine tune your query. Let's review them.

Scan Count - This is an indicator telling you how many times the table(s) that are part of your query were scanned. If your query only accesses one table, the scan count should be one. If you have joins, then there should generally be one scan per table like the example below...

SET STATISTICS IO ON
GO
SET STATISTICS TIME ON
GO
SELECT * FROM SalesLT.Customer C INNER JOIN 
SalesLT.CustomerAddress A ON C.CustomerID=A.CustomerID

Here I am joining two tables and I should expect two scan counts, one for each table and indeed that is the case...
SQL Server parse and compile time: 
   CPU time = 0 ms, elapsed time = 0 ms.

 SQL Server Execution Times:
   CPU time = 0 ms,  elapsed time = 0 ms.
SQL Server parse and compile time: 
   CPU time = 0 ms, elapsed time = 0 ms.

 SQL Server Execution Times:
   CPU time = 0 ms,  elapsed time = 0 ms.
SQL Server parse and compile time: 
   CPU time = 0 ms, elapsed time = 3 ms.

(417 row(s) affected)
Table 'CustomerAddress'. Scan count 1, logical reads 6, physical reads 1, read-ahead reads 1, lob logical reads 0, lob physical reads 0, lob read-ahead reads 0.
Table 'Customer'. Scan count 1, logical reads 36, physical reads 0, read-ahead reads 0, lob logical reads 0, lob physical reads 0, lob read-ahead reads 0.

 SQL Server Execution Times:
   CPU time = 15 ms,  elapsed time = 191 ms.

If your query is scanning the same table more than once, you probably should take a closer look at your query.

Logical Reads
This is probably the most crucial piece of information. As you probably know, SQL Server only reads the data from its cache and it also reads the data in 8K pages. Thus, each logical read reads 8K data page and the number of logical reads determine how many data pages SQL must read to serve up the query. More the number of reads, greater the execution time and resource consumption. Logical reads are usually constant when a query is run multiple times provided it returns the same result set each time.

Physical Reads
As I mentioned earlier, SQL Server only reads the data form its cache. But before the data can be read from the cache, it must be read from physical disk and moved to cache. This process is called physical read. When SQL Server starts executing a query, it first checks to see if data pages it needs are present in data cache. If not, then SQL Server retrieves the data from the disk, one data page per read (8K page) into the data cache. Physical read is lot more slower but if you fine tune your query to reduce the number of logical reads, you will also reduce the number of physical reads.Also, having more memory on your server will mean more data can be cached, hence less physical reads.

Read Ahead Reads
SQL Server tries to read the data from physical drive ahead of time to ensure that the data is available in cache before your query needs it. Your query may or may not use this data.

Let's consider an example:
Suppose when you execute a query, SQL Server determines that you need 20 data pages. It then checks to see how many of these 20 data pages are in cache. Let's assume 4 data pages were in cache. SQL Server while reading the data pages from cache, will also start reading data ahead of time from physical drive. Let's now assume that it reads ahead 15 pages. Now a total of 19 pages are in cache, 1 is still missing. SQL Server will then read the missing data page as physical read and move it to cache. Once all the datapages are in cache, SQL Server will process your query.

Query Tuning is a big topic and there are several important aspects of query tuning. CPU and I/O information is just one piece of information that you can use to determine your query's resource usage and possibly fine tune it.

Thank you.


Tuesday, March 13, 2012

Query Execution Plan

When you are writing a complex query, it is always a good idea to check out the query execution plan to see what is the most taxing operation and if you can do something about it.

When you run a query, SQL Server does two things...
  1. First it checks the validity of the query to ensure there are no syntactical errors and the objects that you are trying to use such as a table, view or a UDF actually exists.
  2. Once the first condition is satisfied, SQL Server then determines the fastest and shortest path it can take to execute your query. You may have indexes on the table(s), but whether SQL server will use them to execute your query largely depends on the optimizer. If a complete table scan is faster, then it will scan the table instead of indexes, but more often than not, it will use the indexes to determine the fastest route.
An execution plan is made up of a series of primitive operations, such as reading a table from top to bottom, using an index, performing loop operations or hash joins. All primitive operations produce an output. They may have one or more inputs and an output of one primitive operation may be an input in the next. Database Optimizer determines the optimal execution plan.

In order to see the query execution plan, open the Query Analyzer and navigate to Query > Display Estimated Execution Plan to see the execution plan without actually executing your query. If you want to execute query and also have query anlayzer display the execution plan select "Include Actual Execution Plan."

If you are running SQL Service Profile, you can capture an event called MISC:Execution Plan to show the execution plan used by the queries that are running in your environment.

You can also run "SET SHOWPLAN_TEXT ON" command in Query Analyzer to show execution plan for any subsequent queries that you may run. If your query uses temp tables, you will have run the command "SET STATISTICS PROFILE ON" before you run the query.

Below are some of the execution plans based off of some sample queries I ran.

1. Simple Select

SELECT U.UserName,S.StoreID FROM  SecUsers U INNER JOIN SecUserStores S ON U.UserID=S.UserID


In this case, 39% of the cost is in join, 40% and 21% in index scan on two tables.

 2. Union - note I am basically running same query twice, but you get the picture.
SELECT S.UserName,SS.StoreID FROM  SecUsers S INNER JOIN SecUserStores SS ON S.SecUserID=SS.SecUserID
UNION ALL
SELECT S.UserName,SS.StoreID FROM  SecUsers S INNER JOIN SecUserStores SS ON S.SecUserID=SS.SecUserID


In this case, since I am basically running same query twice, everything is doubled, but as you can imagine, more complex a query, more taxing.

3. Using Temp Table
DECLARE @tmpTable TABLE(UserName varchar(50), StoreID INT)

INSERT INTO @tmpTable(UserName,StoreID)
SELECT S.UserName,SS.StoreID FROM  SecUsers S INNER JOIN SecUserStores SS ON S.SecUserID=SS.SecUserID

SELECT * FROM @tmpTable

You should avoid temp tables as much as possible, because SQL Server caches the optimal execution plan for regular stored procedures, but it can't do so for a temporary table and must determine the best execution plan everytime.

 4. Sorting Example
SELECT S.UserName,SS.StoreID FROM  SecUsers S INNER JOIN SecUserStores SS ON S.SecUserID=SS.SecUserID ORDER BY SS.StoreID

As you can see, Sort is costly. Try to avoid ORDER BY clause as much as you can. If you must sort, either create an index or sort in your code.

5. WHERE Clause   
SELECT * FROM Orders WHERE BusDT > 30450


 Sometime when you don't have appropriate indexes in place and you show an execution plan, optimizer will provide you an index that you can add to your table.

6. Using a UDF in WHERE Clause
SELECT * FROM Orders WHERE BusDT < dbo.Func_TOOADATE('01/01/2012')


Using a user defined function in where clause in taxing. In essence you are executing two queries. Also, as with temp tables, execution plan for in-line functions is not cached and optimizer must determine the execution plan everytime. You should avoid using functions in WHERE clause whenever possible.


Saturday, March 10, 2012

Managing TempDB database to manage performance

Recently I came across a situation where SQL Server would perform remarkably well for couple of days and then become sluggish to virtually non-responsive. A simple reboot of the server would resolve the issue for the next few days.

Although there were many issues with this database, one thing that jumped out was how the TempDB was configured. First let's discuss TempDB and the crucial role it plays in RDBMS.

TempDB is just like any other database with some caveats. It is globally available to all the users and is used for temporary or transitory storage of data and objects. For example, when you create temporary tables, temporary stored procedures, variables or cursors, they all are stored in TempDB. When you create a cursor for example, you can provide a STATIC hint which will copy the content in TempDB and then read from their.

SQL Server also uses TempDB to store internal objects. If you are using row versioning or snapshot isolation level, the versions are copied into TempDB. Work tables that are creating during sorting etc. are also stored in TempDB. Online indexing operations also store temporary resulset in TempDB database.

Needless to say, TempDB is your work horse and is extremely crucial for SQL Server to perform at optimal level. Everytime you restart your SQL Server, TempDB is automatically created using a clean copy. Any temporarily stored objects are dropped. You also cannot perform backup and restore operations on TempDB.

Now back to the problem this particular SQL Server was experiencing.
  • Initial size of the TempDB data file (mdf) was set to 8 MB (default) and it was set to autogrow by 10%. In a high transaction environment this will result in TempDB trying to autogrow too often and too little. First time growth will be 10% of 8 MB, rougly 800 K. Since the growth increments are so small, once TempDB reaches 8 MB limit, it will be autgrowing often, resulting in data fragmentation. Once you restart the server, TempDB will be reset and start from scratch and repeat the same process again once it reaches 8 MB.
  • TempDB was on the same disk that had all other databases. While this in itself shouldn't be a problem, but imagine 50 or so databases (as was the case here) all set to autogrow by 10% and all fighting for disk space, resulting in a lot of disk fragementation.
As I stated before, there were obviously other issues with this environment, but today we will mainly focus on TempDB.

One of the ways you could alleviate problem like this is by allocating a dedicated hard-drive for TempDB if possible. Start off with sufficient initial size based on your environment. This will vary from environment to environment. Allocate too much space and you are practically wasting space, allocate too little and TempDB is trying to grow more frequently.

In a high transaction environment, you can also distribute the data load into more than one data files. You can create secondary data files (it is recommended to use .ndf extension) and even distribute secondary data files on multiple hard drives (although drive latency may come into play here, so this is generally not recommended).

To change the initial size or autogrowth ratio (10% is sufficient if you start off with big enough initial size) or to add secondary data files, right click on TempDB > Properties > Files via Management Studio and then click on Add button to create additional files.


When adding a file, you can define file location, initial size etc.  You can also move TempDB files to a different location if you are running out of space on the hard drive or if you want to separate them from other databases. Remember, the current files will not move until you restart SQL Server, although new data/logs will be written at the new locaiton.

Moving TempDB files

USE master;
GO
ALTER DATABASE tempdb
MODIFY FILE (NAME = tempDB, FILENAME = '{new location}\tempdb.mdf');
GO
ALTER DATABASE tempdb
MODIFY FILE (NAME = templog, FILENAME = '{new location}\templog.ldf');
GO

TempDB plays a big part in SQL Server performance and keeping your TempDB healthy is one of the crucial ways you can keep your SQL Server performing as expected.

Thank you

Wednesday, February 29, 2012

Using Cursors in SQL Server


Cursors are generally not recommended and are slower compared to other methods of reading data. But there are situations where you must use cursors. I have found them to be useful when I am trying to run a SELECT on a table in Query Analyzer and performance is not a concern.

For example, consider a Stores table that has one to many relationship with another table called StoreHours. The store closes at different time depending on weekday. Also stores close at different times in different regions. You need to run a query to determine the latest closing time for each store. You can easily achieve this by running a cursor.

As I mentioned earlier, cursors are rather slow, but you can increase their performance using FAST_FORWARD and READ_ONLY hints. Also remember to always deallocate and close cursor when done.

Let's use the cursor to select latest closing time for each store, insert them into a temporary table and then select the records from the temp table.

DECLARE @tmpStoreClosing(StoreID INT, ClosingTime DateTime)
DECLARE @StoreID INT
DECLARE curStore CURSOR FAST_FORWARD READ_ONLY FOR
    SELECT StoreID FROM Stores
OPEN curStore
FETCH NEXT FROM curStore INTO @StoreID
WHILE @@FETCH_STATUS=0
    BEGIN
         INSERT INTO @tmpStoreClosing(StoreID,ClosingTime)
         SELECT TOP 1 @StoreID,ClosingTime FROM StoreHours 
         WHERE StoreID=@StoreID ORDER BY ClosingTime DESC
         FETCH NEXT FROM curStore INTO @StoreID
    END
CLOSE curStore
DEALLOCATE curStore

SELECT StoreID,ClosingTime FROM @tmpStoreClosing

You can also improve the performance using INSENSITIVE or STATIC keyword. When this keyword is used, cursor copies the data into tempDB and runs the select from there. The drawback of this approach is that any changes made to the data are not reflected.

FAST_FORWARD is same as FORWARD_ONLY and READ_ONLY combined. Data can only be read and in forward only manner. When using this flag, you can only use FETCH NEXT.

There are ways to achieve the same thing using a WHILE loop, which doesn't have the drawbacks of a cursor. We will discuss using a WHILE loop to achieve the same objective in future post.

Cursors should be avoided and if used they should be used primarily for reading the data in forward only manner.

Thank you.


Sunday, February 19, 2012

SQL Server Locks

                                                                    SQL Server Locks - Part I, Part II, Part III, Part IV

Locking is a major part of any relational database, including SQL Server. The concept of Locking and how database engine issues them and how can you troubleshoot to determine some of the problems your DBMS may be facing is quite large and complex. As a result, we will be covering it in multiple parts. In this part, I will explain the types of locks available to SQL Server and how they are used. Subsequent posts will cover them in more details.

Types of Locks 


Shared Locks
Shared locks are issued at the database level when you connect to a database. They are also issued when you run a SELECT statement against a table i.e. when you read data. Shared locks are issued when you are using the pessimistic concurrency model. When a shared lock is issued, more than one transaction can read the data but the data cannot be modified. After the data has been read, the lock is released, unless you run your queries with READCOMMITTED OR READCOMMITTEDLOCK locking hint (more on these later) or you have a more restrictive isolation level.

Update Locks
They are a combination of shared and exclusive locks. When you issue an update statement, SQL server first searches for the data to be modified. Since SQL engine has to first read the data to be modified and then modify it, it can in theory issue a shared lock when reading the data and then convert it to exclusive lock when updating this data, but this could result in a deadlock, hence instead of using a shared lock then upgrading it to exclusive lock, SQL uses an Update Lock. It is very similar to an exclusive lock in that only one update lock can be held on the data at one time. The difference between an update lock and exclusive lock is that the before the data is modified, update lock has to be converted to an exclusive lock, since an update lock cannot modify the data. You can also provide an UPDLOCK hint in your statements to force an update lock.

Exclusive Locks
These locks are issued to lock the data that is being modified by one transaction to prevent modifications by other concurrent transactions. You cannot even read the data held by exclusive locks, unless you provide "NOLOCK" hint to your select query or you are using read uncommitted isolation level. Since data must be first read before it can be modified, exclusive locks are accompanied by shared or update locks on the same data. NOLOCK hint allows you to read data locked by an exclusive lock, but you may end up reading dirty data i.e. before the data is committed.

Intent Locks
Intent Locks are a mechanism for one transaction to notify others that it is intending to lock the data. Generally a transaction will issue an intent to lock the object that is higher in lock hierarchy than what is currently locked by this transaction. For example, if a transaction has exclusive lock at the row level, it may issue an intent lock on the page level or table level. This prevents others transactions from locking the higher objects. The way this works is before a transaction obtains a lock at the row or page level, it first sets an intent lock on the table. Thus, you get a more granular lock (update lock or exclusive lock) at the lower level after setting an intent level lock on its parent.

Schema Locks
When database engine is generating execution plans, it issues Schema Stability Lock. It doesn't block access to the underlying data. Schema modification lock is used when a DDL statement (Data Definition Language) is being executed i.e. schema is being modified. This lock blocks the access to the underlying data.

Bulk Update Locks
These locks are issues when performing bulk operations and you use TABLOCK hint. They allows for multiple inserts concurrently and prevent data read by other transactions. In essence this is a table lock.

Conversion Locks
Converting one type of lock to other lock results in a conversion lock. There are three types of conversion locks.
  • Shared With Intent Exclusive - A transaction with a shared lock also has exclusive intent lock on some pages/rows.
  • Shared with Intent Update - A transaction with a shared lock also has an update intent lock on some pages/rows.
  • Update with Intent Exclusive- A transaction with an update lock also has an exclusive intent lock on some pages/rows.
Key - Range Locks
When using serializable transaction isolation level, any query that is executed more than once in a transaction must obtain the same set of rows. For example, if a query when executed first time returns 10 rows, any subsequent execution of the same query within the same transaction must return the same 10 set of rows. If this query tries to fetch a row that doesn't exist, it cannot be inserted by other transactions until the first transaction reading the row completes, because if the second transaction was allowed to insert a row, it would appear as a phantom to the first transaction. A key-range lock locks the index rows and the ranges between those index rows. Any attempt to insert/update or delete any row within this range by a second transaction would modify the index, the key-range lock blocks the second transaction until the first transaction completes.

There are two types of Key-Range Locks
  • RangeX-X - Exclusive lock is issued on the interval between the keys and an exclusive lock is issued on the last key in the range.
  • RangeS-U - Shared lock is issued on the interval between the keys and update lock is issued on the last key in the range.
Spin Locks
A light-weight locking in which data is not locked but the transaction waits for a short period of time for a lock to be free if data is already locked. It is a mutual exclusivity mechanism to reduce the context switching between multiple threads.

Lock Granularity
Locks can be issued against a table, page or a row. If a table has a clustered index, there is also a Key lock. When you lock at the lower level with intent to lock at the higher level, it increases concurrency since multiple operations can get the locks they need. It also depends on the isolation level we choose. More restricted the isolation level, more higher level locks to keep data intact. SQL Server allows you to pass hints such as NOLOCK, ROWLOCK, PAGLOCK or TABLOCK to override the default locking based on the isolation level. Although I would discourage using locking hints except in very rare situations.

As I mentioned at the beginning of this post, Locking is a complex topic and we will be covering it in multiple posts. So, watch out for the next post.

Thank you and your comments are welcome!

Saturday, February 18, 2012

SQL Server Transactions

Transactions in SQL Server allows you to batch multiple inserts/updates/deletes in one single process and an error in one sub-step will invalidate or roll back the entire transaction. This ensures the data integrity and atomicity.

Let's assume for example, you have a set of three tables in a SQL database
  • A Employee Profile Table
  • An Earnings table recording the salary, taxes paid etc.
  • A Tax rate table that records an employee's tax rate.
If the tax rate changes, you would want to update the TaxRate table first, then update the Earnings table to reflect the taxes paid (based on new tax rate). For example, if the earnings were $100,000 and the tax rate was 20%, the taxes paid in the Earnings table would be $20,000. Now, if the tax rate jumps to 25%, TaxRate table would be updated to reflect tax rate of 25% and the Earnings table would be reflected to show the updated tax of $25,000.

Now lets assume you are performing these operations as individual updates without wrapping them in one transaction.

      --1st you update tax rate table
       UPDATE TaxRate SET rate=0.25 WHERE EmployeeID=1
       GO
      -- now you update taxes paid 
      UPDATE Earnings SET TaxesPaid = 
      (SELECT Salary * 0.25 FROM Earnings WHERE EmployeeID=1)
      WHERE EmployeeID=1
      GO

Now, lets imagine first update executed successfully but a deadlock or some other error occurred before second update could be performed (more on deadlocks in future posts), resulting in out of sync data. TaxRate table will show the tax rate of 25% but Earnings table will show only $20,000 taxes paid.

You want to ensure that either both tables are updated together or none at all. You can wrap both updates in one transaction, and if an error occurred, entire transaction will rollback, ensuring the data integrity.

Here is how you would wrap the above updates in a transaction.

DECLARE @errorcode INT
BEGIN TRAN
    --1st you update tax rate table
       UPDATE TaxRate SET rate=0.25 WHERE EmployeeID=1
       GO
       -- check if an error occurred
       If @@Error <> 0 GO TO ERROR  -- @@Error would trap any error that may occur
      -- now you update taxes paid 
      UPDATE Earnings SET TaxesPaid =
          (SELECT Salary * 0.25 FROM Earnings WHERE EmployeeID=1)
          WHERE EmployeeID=1
      GO
     -- check again if an error occurred
       If @@Error <> 0 GO TO ERROR
COMMIT TRAN

ERROR:    --- GO TO ERROR statement will jump here anything an error occurred.
PRINT ('An error occurred')
ROLLBACK TRAN

This allows you to declare transaction at the SQL Script level - in a stored procedure for example. You can achieve the same effect by using ADO.NET Transaction or TransactionScope object in code when executing two or more separate stored procedures or in-line SQL.

Using Transaction
public void updateTaxInformation (string connectstring)
{
   using (SqlConnection conn =  new SqlConnection(connectstring))
{
      conn.Open();
      SqlCommand cmd = connection.CreateCommand();    // create sql command
      SqlTransaction trans;   // create a new sql transcation
      // start the transaction
      trans = conn.BeginTransaction("TransName");
     //assign connection and transaction to the command
     cmd.Connection = conn;
     cmd.Transaction = trans;
     try
     {
          cmd.commandText = "UPDATE TaxRate SET rate=0.25 WHERE EmployeeID=1;
          cmd.ExecuteNonQuery();
          //second update
          cmd.commandText = "UPDATE Earnings SET TaxesPaid =
                                             (SELECT Salary * 0.25 FROM Earnings WHERE EmployeeID=1)
                                             WHERE EmployeeID=1;
          cmd.ExecuteNonQuery();
          // commit transaction
         trans.commit();
      }
    catch (Exception ex)
    {
        Console.WriteLine("Exception Occurred: " + ex.Message);
        trans.Rollback();
     }
  }
}

Using TransactionScope
Beginning in .NET 2.0, Microsoft introduced TransactionScope which basically does the same thing as above, except a few subtle differences. TransactionScope simplifies some of the code and takes care of enrolling SQL commands into a transaction autmatically. The above code can be simplified using TransactionScope 

Using (TransactionScope transscope = New TransactionScope())
  {
     using (SqlConnection conn =  new SqlConnection(connectionstring))
       {
          conn.Open();
          SqlCommand cmd = connection.CreateCommand();    // create sql command
          cmd.commandText = "UPDATE TaxRate SET rate=0.25 WHERE EmployeeID=1;
          cmd.ExecuteNonQuery();
          //second update
          cmd.commandText = "UPDATE Earnings SET TaxesPaid =
                                             (SELECT Salary * 0.25 FROM Earnings WHERE EmployeeID=1)
                                             WHERE EmployeeID=1;
          cmd.ExecuteNonQuery();
          transscope.Complete();
         }
    }
       
That's all there is to it. While a transaction has its advantages such as maintaining data integrity, you have to be careful when creating a transaction. Large transactions could result in dreaded deadlocks. We will discuss deadlocks in future posts.

Thank you and your comments are welcome.


Thursday, February 16, 2012

Database Mail - Send Emails from SQL Server

Today, we will discuss how to configure and send emails using SQL Server 2008. Although the setup process is more or less same in both SQL 2005 and SQL 2008. Prior to SQL Server 2005, the database mail was called SQL Mail and lacked a few features that Microsoft introduced in database Mail.

Before you can send emails using SQL Server, you must first create a profile to use when sending emails. Below are step by step instructions on configuring database mail using management studio.

1. Expand Management and right click on Database Mail

2. Click on Next


3. Select the first option "Set up Database Mail by performing the following tasks".


4. Enter a profile name and click on Add. Note, since you won't have a profile setup, you will see the screen in step 5 below.


5. This is where you will enter the SMTP server information. In theory, if you are running IIS on the Database Server, you can configure IIS - SMTP Mail (IIS 7.x no longer have this feature, although there are still ways to configure it for now, but I expect this to go away soon). Whether you should run IIS on database server or not is a whole another argument.

Alternatively, you can configure SMTP server on another machine in your network and use it to send emails from both SQL Server via database mail and also from other applications.


6. Click on OK and click on Next, which will show you the following screen. You can leave defaults in most cases, but you can change the file attachments that you want to prohibit here.


7. Click on Next and click on Finish. Now Database mail is configured and ready to be used. You can right click on Database Mail again and click on Send Test Email to send a test email.

Before you send test email, make sure SQL Server is configured to send emails. Run the following script.


sp_CONFIGURE 'Show Advanced', 1
GO
RECONFIGURE
GO
sp_CONFIGURE 'Database Mail XPs',1
GO
RECONFIGURE
GO


Before you can use the database mail to send emails or alerts from SQL Agent jobs, you need to add operators.

8. Right click on Operators from the Management Studio.

9. Setup one or more Email Operators


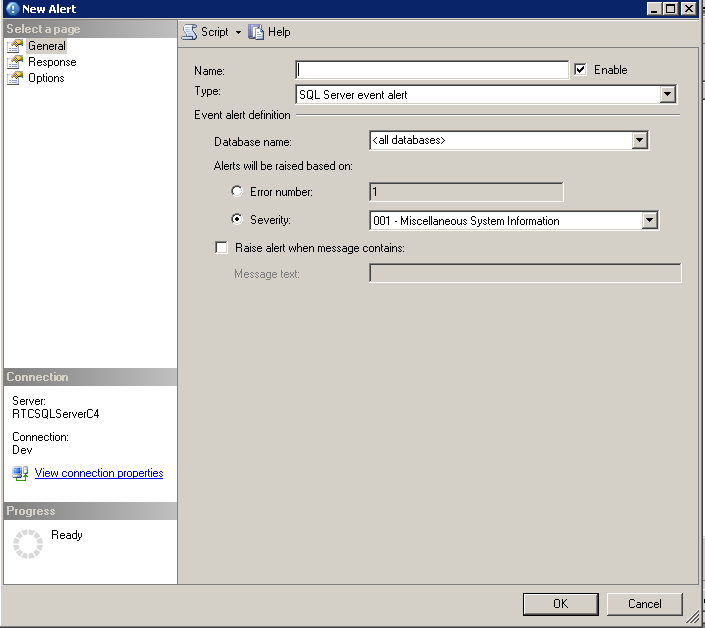
10. Now you are ready to configure a SQL agent job to send an alert or a notification email based on an action.  I will not go through creating a SQL agent job in this post, but let's assume you have a job that you want to send you an alert or an email when it fails. First, we will configure an alert. Right click the job and click on properties. Click on Alerts.


11. You can pick an operator that you created below and the type of alert you want to send. Response and Options allows you to configure additional options.


12. Now lets setup Notification. Click on OK from the Alerts screen to go back to the main screen and click on Notifications. Here you should be able to select the email or page that you want to send and the condition along with the operator you want to send it to.

Click on OK, and you have configured database mail to work with your SQL agent job.

You can also use "sp_send_dbmail" to send an email using SQL script

USE msdb
GO
EXEC sp_send_dbmail @profile_name='YourProfile', @recipients='youremail@email.com',
@subject='Test',@Body='Test Email'

SQL Server stores emails in the following system tables in msdb database. You can run select statements on these tables to check if an email has been successfully processed or failed.

sysmail_allitems, sysmail_sentitems, sysmail_unsentitems, sysmail_faileditems.

sysmail_mailitems has the initial emails and when an email is sent or failed, the sent_status flag is updated and also the email is copied into the appropriate table.

You can also check the log of all the emails in sysmail_log table.

Database Mail is a powerful feature and you can use it to ensure you are getting notified when a critical job didn't execute as it should have.

As always, your comments are welcome.

Monday, February 13, 2012

Benefits of Database Indexing

All About SQL!
In my previous Post I talked about various types of indexes you can create in SQL Server. Today we will discuss the benefits of Indexing and why you should have at least a clustered index in every table.
Every database system offers some kind of indexing that allows for sublinear time lookup for increased performance as opposed to linear search which is highly inefficient. For example, if a table is un-indexed, database engine will examine each record to find the searched record, resulting in approximately half the data rows being scanned on an average. Further, if the searched record doesn't exist, all the data rows will be scanned before a match not found result is returned. Indexing allows for faster searches resulting in improved performance.
Indexing however is a double edged sword. While more indexes generally will result in faster data retrieval from a table, but the more indexes you have, the longer it will take to insert new data in the table.
Depending on your table definition, some indexes are automatically created by the SQL Server. For example, to enforce a UNIQUE constraint. You can create other indexes either via CREATE INDEX statement or by using SQL Management Studio.
Below are some of the guidelines you can use when creating indexes. This is not an exhaustive list and may not be suitable in all situations, so use this as a general guideline.
1. When creating an index, choose the right data type. Certain data types are more suitable for indexing than others. Integer data types (INT, BIGINT, SMALLINT, TINYINT) are good candidates for indexing because of their specific size and are easy to compare and perform other mathematical operation. CHAR, VARCHAR etc. on the other hand are much less inefficient.
2. Make sure that indexes are actually used. I have often seen database schema where indexes were created in advance but any of the data retrieval operations don't use the keys that are indexed.
3. Also keep in mind when a retrieval query applies a SQL function to the keys that are part of the index, the indexed value is not used in the query. For example, you convert a date column which is part of the cluster to a string while retrieving the data. In this case, the index won't be used in the retrieval process.
4. If you create an index with multiple columns, pay attention to the order of the columns. Data is stored in order the columns are used in the index. The column with less unique data should be used first and so on.
5. Remember each non-clustered index column is a pointer to the clustered index columns (assuming clustered index exists in the table). Hence, care should be taken in selecting the number of columns used in the clustered index. For the same reason, try to avoid or limit using the columns that are frequently updated in a clustered index.
6. Be extra careful when rebuilding a clustered index. I have seen it many times where someone has created a SQL job to drop a clustered index and then used the "CREATE INDEX" command to recreate the index. When you drop a clustered index and then recreate it, you end up rebuilding non-clustered indexes multiple times. To avoid this, use DROP_EXISTING clause along with CREATE INDEX which will rebuild non-clustered indexes only once.
As explained in previous Post, use Fill Factor wisely.
I realize this is a long post but I wanted to keep all the crucial points in one blog to make it easier to read. As always your comments are appreciated and please don't hesitate to add other points I may have missed or let me know if I missed anything.

Sunday, February 12, 2012

Database Mirroring

All About SQL! In one of my previous posts I talked about Transaction Log Shipping and how it can be used to create a copy of the database on a secondary server and periodically apply the transaction logs. Mirroring is a similar process except a few differences.

Whereas in Log Shipping, transaction logs are periodically backed up and physically copied to the secondary server and applied to the database in recovery mode. In mirroring, SQL Server directly reads the data from the transaction logs and copies them from the principal server to the mirrored server.

 Mirroring can be configured to operate synchronously or asynchronously. In synchronous configuration, primary or principal server sends the data to the mirrored server and waits until the mirrored server saves the data on the hard-drive before committing the transaction. In this scenario, basically buffered data is sent to the mirrored server and principal waits for a signal from the mirrored instance. Once the signal is received from the mirror, only then the transaction is committed on the principal. As you can imagine the performance of your database depends on several factors such as network bandwidth, disk write speed etc.

 In asynchronous mode, the principal server doesn't wait for the mirrored server before committing the transaction. It sends the buffered data to the mirrored instance, while simultaneously committing the transaction.

Mirroring supports only one mirrored instance. This is yet another difference between Mirroring and Transaction Log Shipping, which supports multiple instances of the secondary server.

Mirroring supports automatic failover. In case of a failure on primary server, SQL Server automatically brings the mirrored instance online, usually within a few seconds.

While Log Shipping has been available since SQL 2000, mirroring was introduced only in SQL Server 2005.

Another key advantage of mirroring is built-in support in .NET Framework which doesn't require special routing or switching code to handle the fail-over switch from one server to another. It requires ADO.NET 2.0 and higher.

SQL Server 2008 introduced another key feature in mirroring, i.e. ability to automatically repair corrupt pages. For example, if a page is corrupted on the principal server, SQL Server will replace it with a page from the mirror and vice versa.

We can go in more technical details in further posts if needed, but in a nutshell this is what mirroring is all about.

As always, your comments are welcome!

Wednesday, February 8, 2012

Creating Indexes using T-SQL

All About SQL!
In my previous post, we discussed creating indexes using SQL Management Studio. You can achieve the same results using SQL Scripts.

Using T-SQL

1.  Create a Non-Clustered, Non-Unique Index

/****** Object:  Index [idx_Test]    Script Date: 02/05/2012 12:56:50 ******/
CREATE NONCLUSTERED INDEX [idx_Test] ON [dbo].[DTA_input]
(
[SessionID] ASC,
[GlobalSessionID] ASC
)WITH (PAD_INDEX  = OFF, STATISTICS_NORECOMPUTE  = OFF,
SORT_IN_TEMPDB = OFF, IGNORE_DUP_KEY = OFF,
DROP_EXISTING = OFF,
ONLINE = OFF,
ALLOW_ROW_LOCKS  = ON,
ALLOW_PAGE_LOCKS  = ON) ON [PRIMARY]
GO

2. Create a Unique Non-Clustered Index

/****** Object:  Index [idx_Test]    Script Date: 02/05/2012 12:59:41 ******/
CREATE UNIQUE NONCLUSTERED INDEX [idx_Test] ON [dbo].[DTA_input]
(
[SessionID] ASC,
[GlobalSessionID] ASC
)WITH (PAD_INDEX  = OFF,
STATISTICS_NORECOMPUTE  = OFF,
SORT_IN_TEMPDB = OFF,
IGNORE_DUP_KEY = OFF,
DROP_EXISTING = OFF,
ONLINE = OFF,
ALLOW_ROW_LOCKS  = ON,
ALLOW_PAGE_LOCKS  = ON) ON [PRIMARY]
GO

HINTS / CLAUSE DEFINITIONS

PAD_INDEX
This option specifies whether you want to leave some space in each node (also referred to as page) for future inserts/updates. This is only useful when you specify a fill factor, because it uses the % specified in fill factor. Default is OFF.

STATISTICS_NORECOMPUTE
This flag determines whether index statistics are automatically recomputed. If you set it to ON, your SQL Query Optmizer may not be able to pick the optimal execution plan for any queries using this table.

SORT_IN_TEMPDB
Specifies that during index build/rebuild, intermediate sort results will be stored in tempDB. If your tempDB is on a different disk(s) than your production DB, it may reduce the time needed to create an index.

IGNORE_DUP_KEY
As I discussed in one of my previous post, when this option is ON and an attempt is made to insert a duplicate key, server issues a warning and ignores the duplicate row. If this option is OFF, server issues an error message and rolls back the entire INSERT. This clause can only be turned on if you have specified UNIQUE clause in your index.

DROP_EXISTING
This clause signals the SQL Server to drop and rebuild the pre-existing index with the same name. When you drop a clustered index, all non-clustered indexes must be rebuilt because they contain pointers to clustered index keys. This clause is extremely useful when dropping a clustered index on the table that also has non-clustered indexes. The non-clustered indexes are rebuilt only once and only if the keys are different.

ONLINE
This clause needs some explanation. When this clause is ON, it means database can be online i.e. being used for other processes while Index is being built or rebuilt. In other words, Index operations do not need exclusive lock. Default is OFF meaning indexing operation requires exclusive lock on the table. This was a nice enhancement in SQL 2005. Prior versions required exclusive lock for index operations. Some of columns such as VARCHAR(MAX) cannot be indexed while online.

ALLOW_ROW_LOCKS
This clause specifies whether data row is locked when performing operations on the indexed keys. When performing OLTP operations, it is a good practice to leave turn this ON.

ALLOW_PAGE_LOCKS
This clause determines whether the entire data page will be locked during index operations.

If both clauses are OFF, SQL Engine will not lock data page or data rows instead entire table will be locked during the operation.

Generally, it is a good idea to leave the defaults alone unless you have a very good reason to change them.

Thank you and as always, your comments are welcome!

Monday, February 6, 2012

Creating Indexes using Management Studio

All About SQL!
In my previous two posts, I wrote about the indexes in general and why you should create them. In this blog, I will walk through creating an index using Visual Studio Management.
Note: I have used SQL 2008 Management Studio, but the process is more or less same in SQL 2005.
Using SQL Management Studio
1. Open Management Studio and expand the database > table you want to index.


2. Select the appropriate name. I generally add a prefix to the name "idx_". Also select whether the index is a clustered or non-clustered index. (Remember, only one clustered index is allowed in a table). Check Unique checkbox if you want the index to not allow duplicate keys.

3. Click on "Add" and select the columns you want to index. As we discussed in previous post, CHAR/VARCHAR are not good candidate keys, unless you have to use them. The order is also very important. The key which will have most duplicate data should be ranked first.


4. Go to Options and adjust the settings as needed. Defaults are generally OK here but you may want to adjust fill factor. See my previous post to learn more about fill factor.


That's all there is to it. Click on OK and you are done!
As always, feel free to leave me comments!
Thank you