Saturday, March 31, 2012

Database Normalization - First Normal Form

So far we focused on database administration and management. Moving forward, we will focus on database design, development and database performance in terms of using proper data query etc.

Today, we will review database normalization. Everyone familiar with RDBMS is probably also familiar with database normalization, but it is good to review it before we embark on database design.

Normalization:
Normalization is a way to arrange your database schema in such a way as to minimize data redundancy and duplication. For example, if you have two tables in your database - Customers and Orders. If your database is not normalized, you may store Customer Name in both Customers and Orders tables to relate the order to a customer. Apart from storing the same information twice, you also have a real problem where data could get out of sync. If your customer gets married and changes her last name, you must update her name in both tables. One of the key strength of relational databases over flat flies such as text file is their ability to relate the data across tables without having to duplicate it, hence the term "Relational".

Types of Normalization
The inventor of relational model, Edgar F. Codd defined the first, second and third normal form or 1NF, 2NF and 3NF respectively. Later on, Codd and Boyce defined the Boyce-Codd Normal Form (BCNF) also called 4NF. 5th and 6th normal forms (5NF, 6NF) were defined later on. Generally, most database adhere to 3rd Normal Form and in most cases a 3NF will also adhere to 4NF and 5NF (but not always).

When you are designing a database, care should be taken to design your database as normalized as possible. However, normalization comes at a cost, and you may have to selectively de-normalize a few tables. In some schemes such as data warehousing, you keep your design denormalized for performance reasons and primarily because you are typically not updating the data in a data warehouse.

A well normalized database not only reduces the data anomalies and redundancies, it also makes future modifications to the database easier. For example, let's assume you have a table that stores 4 phone numbers and all numbers are stored in columns of a single row, i.e. one column for each phone number. What would happen if you have to now record 5th phone number? You have to modify your table and add a 5th column to store the 5th number and since not all users will have 5 numbers, you will have a null values in several columns for most of your users.

First Normal Form (1NF)
1NF has two rules - First rule says that we do not duplicate data in the same row of a table. Recall the above example, i.e. you store 4 phone numbers for every user in 4 columns of the same row. But not all users will have all 4 numbers resulting in lot of null values (hence duplicate data). Adding a 5th phone number will require table schema modification. So how do we solve this? Well, you can create a table called PhoneNumbers with two columns

  • Name
  • PhoneNumber
Now you can have as many phone numbers per user. But, this is not 1NF yet. The second rule states that each row in a related table should have a unique (primary key). You could say that we can make PhoneNumber a primary key. But what if the same phone number is shared by two users? How about making Name and Phone Number (composite key) as a primary key? Well, close but what if two users who share the same phone number happen to have the same name? To make this table 1NF, we have to have a truely unique key. How about adding an identity field and making it a primary key? That will ensure every record has a unique key and will make our table 1NF.

In next post, we will discuss Second Normal Form (2NF).

Thank you.

Sunday, March 25, 2012

Using Unicode Data Types


In previous post, we discussed Collation and how non-Unicode character data is interpreted based on the collation type used. We also discussed how each collation type uses a specific code page. It is possible for one code page to implement multiple collations. But if your application supports international users, it becomes increasingly difficult to find a collation that will support your entire user base.

 Another issue is that some characters cannot be encoded with 1 byte which is used in non-Unicode scheme to encode each character. 1 bye can only represent 256 different characters but some languages such as Kanji (Japanese) or Hangul (Korean) have thousands of characters that must be encoded by 2 bytes.

To rephrase, a non-Unicode encoding scheme encodes each character with 1 byte and can only encode 256 characters. A Unicode encoding system encodes each character using 2 byte and is capable of encoding over 65000 characters. (You can use a non-Unicode encoding system to encode a character that requires 2 bytes, in which case SQL Server will use double byte character set (DBCS) code page).

A non-Unicode scheme is more universal and SQL Server doesn't use code pages to interpret non-Unicode characters. For every non-Unicode character data type in SQL Server, there is an equivalent Unicode character data type (Char > nChar, varchar > nvarchar, text > ntext). If all the SQL data type variables in your application and stored procedures also use Unicode data types, there won't be a need to perform character translations, resulting in performance gain and all the users anywhere in the world will see the same characters.

SQL Server itself stores all the system catalog data such as table, view and stored procedure names in Unicode columns (checkout views/tables/system stored procedures in Master DB).

Unicode standard is maintained by Unicode Consortium and SQL Server supports the Unicode Standard Version 3.2.

Performance Impact
When you declare a column with a Unicode data type, all the characters (regardless of whether they can be represented by 1 byte or require 2 byte) will be stored using 2 bytes, which results in doubling the storage size. For example, a varchar column can store a maximum of 8000 characters (size of a datapage), nvarchar can only store a maximum of 4000 characters. Besides the storage limitation, whether Unicode storage will have performance impact largely depends on your specific situation.

For example, if you define non-Unicode data type but use Windows Collation, SQL Server will use Unicode sorting rules, which are much more resource intensive and complex. So, the performance impact between non-Unicode but with Windows Collation and Unicode will be same. If you did however use non-Unicode data type but with SQL Server collation, sorting and table scan is less resource intensive and faster. Additionally, Unicode data types sorting be slower when you are sorting lots of data because the charaters are stored in double-bytes vs. single byte. Other performance impact could come from conversion between Unicode and non-Unicode if your application uses non-Unicode data types and SQL uses Unicode data types.

Non-Unicode collation is generally good if your application will only be used by the users that can be supported by SQL Server Collation. If you must use Windows Collation or if you must offer universal support, it is best to use Unicode data types.


Saturday, March 24, 2012

SQL Server Collation

Collation determines the rules for sorting / comparing the string characters based on a specific language / locale. For example, depending on your collation, the "ORDER BY" clause may return different results. Default collation in SQL Server is Latin1_General which would sort "Children" before "College" when you run an ORDER BY ASC clause. If your database collation however was "Traditional_Spanish", the sort order will be College before Children because in Spanish "Ch" will be treated as one word and will come after all words beginning with "C".
A specific code page is associated with non-Unicode characters such as char, varchar, text. For example, Latin1_General collation Char is interpreted by SQL Server using 1252 code page. Multiple collations may use the same code page. Unicode data such nchar, nvarchar, ntext doesn't use code pages to handle the data interpretation.

In addition to using SQL Server Collations, you can also use Windows Collations. When using Windows Collation, SQL Server will use collation of the windows OS it is running on to determine the sorting of the characters. To know more about Windows and SQL Server Collations, checkout the following MSDN article - http://msdn.microsoft.com/en-us/library/ms175194.aspx

Determining which Collation to Use
If your application is going to be used where all users speak the same language, you should use the collation that supports the language of your user base. If however your users may speak different languages, you should pick the best available collation that would support most of the languages. For example, Latin1_General collation will support western European languages. Alternatively,you can use Unicode data-types such as nchar, nvarchar, ntext (we will discuss implications of using Unicode data-types in future post). Even though Unicode data-types don't use code pages, it is good practice to pick the collation for the language(s) used by majority of your users in case a column or a variable is declared as a non-Unicode data-type.

Collation can be specified at the Server level, Database level, Column, Parameters or variable level. When you install SQL Server, you can specify a collation, which will be the default collation for all the lower level objects i.e. Database, Column etc. You can also change the collation at each level.

Database level Collation
You can specify database collation when creating a database either via management studio or via T-SQL. In Management Studio, when you are creating a database, go to options and pick the collation from the drop-down list. To specify collation using T-SQL you can use a script like this one...
USE master;
GO
CREATE DATABASE MyCollationTest
COLLATE French_CI_AI;
GO
Verify collation
SELECT name, collation_name
FROM sys.databases
WHERE name = N'MyCollationTest';
GO


You can also change the Collation of a database after it has been created. Before you change the collation of an existing database, make sure you are connected to the database in a Single User mode. Also, if any Schema-bound objects such as UDFs, Computed Columns etc. depend on current collation, SQL Server will generate an error. You can change use the following script...
USE master;
GO

ALTER DATABASE MyCollationTest
COLLATE SQL_Latin1_General_CP1_CI_AS ;
GO


Column level Collation
You can specify a different collation for char, nchar, varchar, nvarchar, text or ntext columns. When creating a new table or modifying an existing table via Management Studio, you can specify the collation in column properties section. Alternatively you can use T-SQL like this...
CREATE TABLE MyTable
  (ID   int PRIMARY KEY,
   Name      varchar(50) COLLATE French_CI_AS NOT NULL
  )
GO
OR

ALTER TABLE MyTable ALTER COLUMN Name
            varchar(50)COLLATE Latin1_General_CI_AS NOT NULL
GO


You cannot alter the collation for a computed column, an indexed column, or a column is used as a foreign key, has a check constraint or is part of the statistics statement.

You can also specify which collation to use in ORDER BY clause of your query. For example...
USE AdventureWorks2008R2;
GO
SELECT LastName FROM Person.Person
ORDER BY LastName
COLLATE Traditional_Spanish_ci_ai ASC;
GO

For the most part default collation works and if you always use Unicode data types, then you don't need to specify collation, but different collation types exist, if you need them.

Thank you.

Wednesday, March 21, 2012

Using CPU Resource Governor for SQL Backups

As we discussed in previous post, while compressing data during backup operations will result in efficient disk I/O operations, it will significantly increase CPU usage which could impede other operations.

You can set a lower priority backup operation limiting CPU usage by using resource governor. In this post we will describe how to configure backup operation as a low priority operation.

There are several steps you have to complete to setup a resource governor.

1. Setup a SQL Server login you would use to perform this operation. Alternatively, you can use an existing user.

For example, you can run the following query to create a windows user, grant permission and assign the role of backup operator to the AdventureWorks database.
-- Create a new login
USE master;
CREATE LOGIN [<Your Domain>\ResourceGovernor] FROM WINDOWS;
GRANT VIEW SERVER STATE TO [<Your Domain>\ResourceGovernor];
GO
-- add this user to AdventureWorks and assign him/her to DB Operator rule
USE AdventureWorks;
CREATE USER [<Your Domain>\ResourceGOvernor] FOR LOGIN [<Your Domain>\ResourceGovernor];
EXEC sp_addrolemember 'db_backupoperator', '<Your Domain>\ResourceGovernor';
GO

2. Create a Resource Governor resource pool which will limit the maximum average CPU bandwidth that will be given to this resource pool. You can create a resource pool governor using the following command.
CREATE RESOURCE POOL CPUGovernor;
GO
ALTER RESOURCE GOVERNOR RECONFIGURE;
GO
It will create a resource pool called CPUGovernor with default settings. You can also pass additional parameters such as...

MIN_CPU_PERCENT - The minimum % of CPU resource to limit for this pool.
MAX_CPU_PERCENT - The maximum % of CPU resource to limit for this pool.
MIN_MEMORY_PERCENT - The minimum % of memory to limit for this pool.  MAX_MEMORY_PERCENT - The maximum % of memory resource to limit for this pool.

CREATE RESOURCE POOL CPUGovernor
 WITH
    (  MIN_CPU_PERCENT = 2,
       MAX_CPU_PERCENT = 10,
       MIN_MEMORY_PERCENT = 10,
       MAX_MEMORY_PERCENT = 20
    )


3. Create a Resource Governor workload group that will use this pool.
CREATE WORKLOAD GROUP NewWorkLoadGroup
    USING "default" ;
GO

This will create a new workload group with default values. Alternatively, you can pass certain parameters.
CREATE WORKLOAD GROUP NewWorkLoadGroup
WITH
    ( IMPORTANCE = { LOW | MEDIUM | HIGH },
      REQUEST_MAX_MEMORY_GRANT_PERCENT=10, --max amount of memory a single request can take
      REQUEST_MAX_CPU_TIME_SEC=10, --max CPU time a request can take
      REQUEST_MEMORY_GRANT_TIMEOUT_SEC=10, --max time a query can wait for memory 
      MAX_DOP = 1 -- specifies maximum degree of parallelism
      GROUP_MAX_REQUESTS = 2 -- maximum # of simultaneous requests that can execute)
[ USING { pool_name | "CPUGovernor" } ] -- using above defined resource pool


4. Create a user defined classifier function which will relate the user you created in step 1 with the workload you created in step 3.
CREATE FUNCTION func_ResourceGovernor() RETURNS sysname

WITH SCHEMABINDING

AS

BEGIN

DECLARE @workloadGroup AS sysname

IF (SUSER_NAME() = '<Your Domain>\ResourceGovernor') -- SUSER_NAME() is a system function

SET @workloadGroup = 'NewWorkLoadGroup'

RETURN @workloadGroup

END

5. Alter Resource Governor to configure it with classifier function.
ALTER RESOURCE GOVERNOR WITH (CLASSIFIER_FUNCTION = func_ResourceGovernor);

6. Issue a second reconfigure command to apply the changes
ALTER RESOURCE GOVERNOR RECONFIGURE;

Let's put all this together in one script.
-- Configure Resource Governor.
BEGIN TRAN
USE master;
-- Create a resource pool that sets the MAX_CPU_PERCENT to 10%. 
CREATE RESOURCE POOL CPUGovernor
   WITH
      (MAX_CPU_PERCENT = 10);
GO
-- Create a workload group to use this pool. 
CREATE WORKLOAD GROUP NewWorkLoadGroup
USING CPUGovernor;
GO
-- Create a classification function.

CREATE FUNCTION dbo.func_ResourceGovernor() RETURNS sysname 
WITH SCHEMABINDING
AS
BEGIN
    DECLARE @workloadGroup AS sysname
      IF (SUSER_NAME() = '\ResourceGovernor')
          SET @workloadGroup = 'NewWorkLoadGroup'
    RETURN @workloadGroup 
END;
GO

-- Register the classifier function with Resource Governor.
ALTER RESOURCE GOVERNOR WITH (CLASSIFIER_FUNCTION= dbo.func_ResourceGovernor);
COMMIT TRAN;
GO
-- Start Resource Governor
ALTER RESOURCE GOVERNOR RECONFIGURE;
GO


I realize this is a tedious process, but it could be very useful when your server is experiencing a heavy workload and you cannot schedule your backups to run during low usage.

Thank you.

Sunday, March 18, 2012

Compressing Data during Backup

SQL Server 2008 introduced backup compression feature - a big relief for those environments that never seem to have enough space.

As you can imagine, compressing the data results in smaller backup file resulting in less device I/O, which increases the backup speed significantly. However, the compression process will increase the CPU usage many fold, which may impact other resources running on the server. You can limit CPU usage by using the resource governor. We will discuss how to limit CPU usage in future post.

You can also determine the I/O performance of your backup by using Windows performance counters. SQL Server Objects provide two I/O performance counters that you can use
  1. The Device Throughout Bytes/sec - This counter is part of the SQLServerBackup Device Object.
  2. Backup / Restore Throughput / sec - This counter is part of the SQLServerDatabases object.
We recently upgraded from SQL 2005 to 2008 and the first thing I enabled was backup compression. After enabling the compression, I conducted a dry-run on a 350 GB database. When the backup process started, SQL Server created a backup file of about 124 GB, but once the backup completed, the file was shrunk to 69 GB. Based on my understanding, I knew the compression happens during the backup process and not afterwards - in other words the data is compressed while it is being backed up and not compressed after the file has been written on the file system. After further research and finally getting in touch with a SQL MVP, we found the real cause.

When SQL Server starts a compressed backup process, it has no idea about how much data will be compressed (compression ratio depends on the type of the data stored in the database), so it makes an educated guess (roughly1/3rd of the size of the data being backed up) and pre-allocates space on the storage media to write the compressed file. Almost always the compressed file will be smaller than the allocated space (if it is larger, the allocated size will obviously extend), hence the actual file size is generally smaller. Imagine SQL Server allocating small space and then having to re-extend during the backup process.

I learned another tidbit about this pre-allocation process. Apparently you can disable this process by turning on Trace Flag 3042. Be sure to turn it off after the backup has completed. 
      
         DBCC TRACECON(3042, -1)  -- turn on
         DBCC TRACEOFF (3042, -1) -- turn off

Obviously turning off pre-allocation comes at a performance cost because now the space must be dynamically allocated during the backup operation, but it comes in handy when you don't have enough space on the storage drive.

See Microsoft KB article for more information - http://support.microsoft.com/kb/2001026

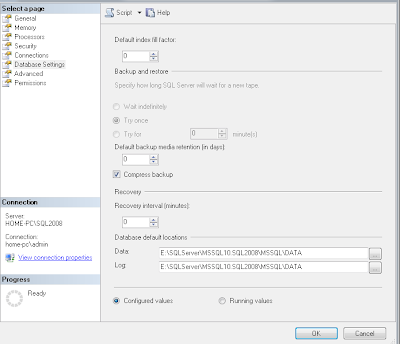
Backup compression is off by default when you install SQL Server. You can turn it on either by using sp_configure stored procedure or via management studio.

Via Management Studio
Right click on your SQL instance > Properties > Database Settings

Alternatively, you can run sp_configure

USE master;
GO
EXEC sp_configure ‘backup compression default’, '1';
RECONFIGURE WITH OVERRIDE;

To override default for just one database or just one backup, you can use WITH COMPRESSION in your backup statement.
USE MASTER
GO
BACKUP DATABASE AdventureWorks
TO DISK='E:\AdventureWorks2008R2.bak'
WITH COMPRESSION;
GO

To determine the compression ratio of a backup, you can check the backup history in Master DB.
USE MASTER
GO
SELECT backup_size/compressed_backup_size FROM msdb..backupset;
GO

Thank you.

Friday, March 16, 2012

Query Execution - Determining CPU and I/O Usage

In previous post we discussed SQL Query Execution plan and how you can anlayze the execution plan, determine the steps that take the longest time to run and possibly optimize your query. We will take this process further and discuss disk access and CPU time and how you can analyze it.

As you already know, the data is stored on physical disks and every time you run a query, the data is either retrieved from the disk or saved to the disk. To reduce the read time from disk, SQL Server caches data. When data is read from the cache, it is called logical read; when it is read from the physical drive, it is physical read. Disk I/O operations are probably slowest of all operations and depend largely on the hard drive speed, latency etc.

So, how do you determine what resources are being used by your query and how you may be able to minimize the resource usage, increasing the performance.

SQL Server provides two commands "SET STATISTICS IO ON" and SET STATISTICS TIME ON" that you can turn on to determine the I/O and CPU usage when you run a query.

I recently downloaded and installed AdventureWorks database for SQL Server 2008 r2. You can download and install it in your test environment to test these examples. Here is the download link.

USE AdventureWorksDW
GO
SET STATISTICS IO ON
GO
SET STATISTICS TIME ON
GO
SELECT * FROM DimCustomer

When you turn on I/O and TIME statistics and execute the query like we did above, you will see something like this under messages tab

SQL Server parse and compile time: 
   CPU time = 0 ms, elapsed time = 0 ms.

(18484 row(s) affected)
Table 'DimCustomer'. Scan count 1, logical reads 1002, physical reads 0, read-ahead reads 0, lob logical reads 0, lob physical reads 0, lob read-ahead reads 0.

 SQL Server Execution Times:
   CPU time = 15 ms,  elapsed time = 951 ms.


This is my test bed with no load, but these numbers will be different in production environment and will vary depending on the load on the server.

Let's understand what these numbers mean...

1. SET STATISTICS TIME ON


There are two numbers here -

SQL Server Parse and Compile time:- These numbers tell us how much CPU time it took to parse your    query and compile it and also the time elapsed since your query started running. Stored Procedures are generally compiled and subsequent executions run the previously compiled version. As such, 1st run of a stored procedure will have some CPU time here, but subsequent runs should show CPU time = 0 or very negligible.

SQL Server Execution Times: - CPU time is the time it took for your query to execute and should be relatively constant, regardless of whether your server is busy or not. The elapsed time will change depending on the server load. If CPU time is really long, then you know you've got a problem and should be looking to fine tune the query.

2. SET STATISTICS IO ON
There are several bits of information here, some of which may be helpful if you are looking to fine tune your query. Let's review them.

Scan Count - This is an indicator telling you how many times the table(s) that are part of your query were scanned. If your query only accesses one table, the scan count should be one. If you have joins, then there should generally be one scan per table like the example below...

SET STATISTICS IO ON
GO
SET STATISTICS TIME ON
GO
SELECT * FROM SalesLT.Customer C INNER JOIN 
SalesLT.CustomerAddress A ON C.CustomerID=A.CustomerID

Here I am joining two tables and I should expect two scan counts, one for each table and indeed that is the case...
SQL Server parse and compile time: 
   CPU time = 0 ms, elapsed time = 0 ms.

 SQL Server Execution Times:
   CPU time = 0 ms,  elapsed time = 0 ms.
SQL Server parse and compile time: 
   CPU time = 0 ms, elapsed time = 0 ms.

 SQL Server Execution Times:
   CPU time = 0 ms,  elapsed time = 0 ms.
SQL Server parse and compile time: 
   CPU time = 0 ms, elapsed time = 3 ms.

(417 row(s) affected)
Table 'CustomerAddress'. Scan count 1, logical reads 6, physical reads 1, read-ahead reads 1, lob logical reads 0, lob physical reads 0, lob read-ahead reads 0.
Table 'Customer'. Scan count 1, logical reads 36, physical reads 0, read-ahead reads 0, lob logical reads 0, lob physical reads 0, lob read-ahead reads 0.

 SQL Server Execution Times:
   CPU time = 15 ms,  elapsed time = 191 ms.

If your query is scanning the same table more than once, you probably should take a closer look at your query.

Logical Reads
This is probably the most crucial piece of information. As you probably know, SQL Server only reads the data from its cache and it also reads the data in 8K pages. Thus, each logical read reads 8K data page and the number of logical reads determine how many data pages SQL must read to serve up the query. More the number of reads, greater the execution time and resource consumption. Logical reads are usually constant when a query is run multiple times provided it returns the same result set each time.

Physical Reads
As I mentioned earlier, SQL Server only reads the data form its cache. But before the data can be read from the cache, it must be read from physical disk and moved to cache. This process is called physical read. When SQL Server starts executing a query, it first checks to see if data pages it needs are present in data cache. If not, then SQL Server retrieves the data from the disk, one data page per read (8K page) into the data cache. Physical read is lot more slower but if you fine tune your query to reduce the number of logical reads, you will also reduce the number of physical reads.Also, having more memory on your server will mean more data can be cached, hence less physical reads.

Read Ahead Reads
SQL Server tries to read the data from physical drive ahead of time to ensure that the data is available in cache before your query needs it. Your query may or may not use this data.

Let's consider an example:
Suppose when you execute a query, SQL Server determines that you need 20 data pages. It then checks to see how many of these 20 data pages are in cache. Let's assume 4 data pages were in cache. SQL Server while reading the data pages from cache, will also start reading data ahead of time from physical drive. Let's now assume that it reads ahead 15 pages. Now a total of 19 pages are in cache, 1 is still missing. SQL Server will then read the missing data page as physical read and move it to cache. Once all the datapages are in cache, SQL Server will process your query.

Query Tuning is a big topic and there are several important aspects of query tuning. CPU and I/O information is just one piece of information that you can use to determine your query's resource usage and possibly fine tune it.

Thank you.


Tuesday, March 13, 2012

Query Execution Plan

When you are writing a complex query, it is always a good idea to check out the query execution plan to see what is the most taxing operation and if you can do something about it.

When you run a query, SQL Server does two things...
  1. First it checks the validity of the query to ensure there are no syntactical errors and the objects that you are trying to use such as a table, view or a UDF actually exists.
  2. Once the first condition is satisfied, SQL Server then determines the fastest and shortest path it can take to execute your query. You may have indexes on the table(s), but whether SQL server will use them to execute your query largely depends on the optimizer. If a complete table scan is faster, then it will scan the table instead of indexes, but more often than not, it will use the indexes to determine the fastest route.
An execution plan is made up of a series of primitive operations, such as reading a table from top to bottom, using an index, performing loop operations or hash joins. All primitive operations produce an output. They may have one or more inputs and an output of one primitive operation may be an input in the next. Database Optimizer determines the optimal execution plan.

In order to see the query execution plan, open the Query Analyzer and navigate to Query > Display Estimated Execution Plan to see the execution plan without actually executing your query. If you want to execute query and also have query anlayzer display the execution plan select "Include Actual Execution Plan."

If you are running SQL Service Profile, you can capture an event called MISC:Execution Plan to show the execution plan used by the queries that are running in your environment.

You can also run "SET SHOWPLAN_TEXT ON" command in Query Analyzer to show execution plan for any subsequent queries that you may run. If your query uses temp tables, you will have run the command "SET STATISTICS PROFILE ON" before you run the query.

Below are some of the execution plans based off of some sample queries I ran.

1. Simple Select

SELECT U.UserName,S.StoreID FROM  SecUsers U INNER JOIN SecUserStores S ON U.UserID=S.UserID


In this case, 39% of the cost is in join, 40% and 21% in index scan on two tables.

 2. Union - note I am basically running same query twice, but you get the picture.
SELECT S.UserName,SS.StoreID FROM  SecUsers S INNER JOIN SecUserStores SS ON S.SecUserID=SS.SecUserID
UNION ALL
SELECT S.UserName,SS.StoreID FROM  SecUsers S INNER JOIN SecUserStores SS ON S.SecUserID=SS.SecUserID


In this case, since I am basically running same query twice, everything is doubled, but as you can imagine, more complex a query, more taxing.

3. Using Temp Table
DECLARE @tmpTable TABLE(UserName varchar(50), StoreID INT)

INSERT INTO @tmpTable(UserName,StoreID)
SELECT S.UserName,SS.StoreID FROM  SecUsers S INNER JOIN SecUserStores SS ON S.SecUserID=SS.SecUserID

SELECT * FROM @tmpTable

You should avoid temp tables as much as possible, because SQL Server caches the optimal execution plan for regular stored procedures, but it can't do so for a temporary table and must determine the best execution plan everytime.

 4. Sorting Example
SELECT S.UserName,SS.StoreID FROM  SecUsers S INNER JOIN SecUserStores SS ON S.SecUserID=SS.SecUserID ORDER BY SS.StoreID

As you can see, Sort is costly. Try to avoid ORDER BY clause as much as you can. If you must sort, either create an index or sort in your code.

5. WHERE Clause   
SELECT * FROM Orders WHERE BusDT > 30450


 Sometime when you don't have appropriate indexes in place and you show an execution plan, optimizer will provide you an index that you can add to your table.

6. Using a UDF in WHERE Clause
SELECT * FROM Orders WHERE BusDT < dbo.Func_TOOADATE('01/01/2012')


Using a user defined function in where clause in taxing. In essence you are executing two queries. Also, as with temp tables, execution plan for in-line functions is not cached and optimizer must determine the execution plan everytime. You should avoid using functions in WHERE clause whenever possible.


Saturday, March 10, 2012

Managing TempDB database to manage performance

Recently I came across a situation where SQL Server would perform remarkably well for couple of days and then become sluggish to virtually non-responsive. A simple reboot of the server would resolve the issue for the next few days.

Although there were many issues with this database, one thing that jumped out was how the TempDB was configured. First let's discuss TempDB and the crucial role it plays in RDBMS.

TempDB is just like any other database with some caveats. It is globally available to all the users and is used for temporary or transitory storage of data and objects. For example, when you create temporary tables, temporary stored procedures, variables or cursors, they all are stored in TempDB. When you create a cursor for example, you can provide a STATIC hint which will copy the content in TempDB and then read from their.

SQL Server also uses TempDB to store internal objects. If you are using row versioning or snapshot isolation level, the versions are copied into TempDB. Work tables that are creating during sorting etc. are also stored in TempDB. Online indexing operations also store temporary resulset in TempDB database.

Needless to say, TempDB is your work horse and is extremely crucial for SQL Server to perform at optimal level. Everytime you restart your SQL Server, TempDB is automatically created using a clean copy. Any temporarily stored objects are dropped. You also cannot perform backup and restore operations on TempDB.

Now back to the problem this particular SQL Server was experiencing.
  • Initial size of the TempDB data file (mdf) was set to 8 MB (default) and it was set to autogrow by 10%. In a high transaction environment this will result in TempDB trying to autogrow too often and too little. First time growth will be 10% of 8 MB, rougly 800 K. Since the growth increments are so small, once TempDB reaches 8 MB limit, it will be autgrowing often, resulting in data fragmentation. Once you restart the server, TempDB will be reset and start from scratch and repeat the same process again once it reaches 8 MB.
  • TempDB was on the same disk that had all other databases. While this in itself shouldn't be a problem, but imagine 50 or so databases (as was the case here) all set to autogrow by 10% and all fighting for disk space, resulting in a lot of disk fragementation.
As I stated before, there were obviously other issues with this environment, but today we will mainly focus on TempDB.

One of the ways you could alleviate problem like this is by allocating a dedicated hard-drive for TempDB if possible. Start off with sufficient initial size based on your environment. This will vary from environment to environment. Allocate too much space and you are practically wasting space, allocate too little and TempDB is trying to grow more frequently.

In a high transaction environment, you can also distribute the data load into more than one data files. You can create secondary data files (it is recommended to use .ndf extension) and even distribute secondary data files on multiple hard drives (although drive latency may come into play here, so this is generally not recommended).

To change the initial size or autogrowth ratio (10% is sufficient if you start off with big enough initial size) or to add secondary data files, right click on TempDB > Properties > Files via Management Studio and then click on Add button to create additional files.


When adding a file, you can define file location, initial size etc.  You can also move TempDB files to a different location if you are running out of space on the hard drive or if you want to separate them from other databases. Remember, the current files will not move until you restart SQL Server, although new data/logs will be written at the new locaiton.

Moving TempDB files

USE master;
GO
ALTER DATABASE tempdb
MODIFY FILE (NAME = tempDB, FILENAME = '{new location}\tempdb.mdf');
GO
ALTER DATABASE tempdb
MODIFY FILE (NAME = templog, FILENAME = '{new location}\templog.ldf');
GO

TempDB plays a big part in SQL Server performance and keeping your TempDB healthy is one of the crucial ways you can keep your SQL Server performing as expected.

Thank you

Thursday, March 8, 2012

FTP Files using SQL Server

In previous post we discussed BCP command and how it can be used to generate a csv file to a specified location. Today, we will see how you can FTP file created via BCP command to a given FTP Server. If you haven't done so, I suggest you review the previous post as we will build on that.

Note, this nice little stored procedure was originally developed by Nigel Rivett, although I have modified it a bit to better explain it here.

Previously, we created a file called "payroll.csv" in C:\Temp\Folder. Today, we will FTP this file to an FTP Server.

Lets create a stored procedure which will accept FTP parameters, file to FTP and then use xp_cmdshell to ftp the file.

CREATE PROCEDURE [dbo].[sp_FTP]
    @ServerName      varchar(50) ,
    @UserName        varchar(50) ,
    @Password        varchar(50) ,
    @FilePath        varchar(255) ,
    @FileName        varchar(255) ,
    @SourcePath      varchar(255) ,
    @SourceFile      varchar(255) ,
    @WorkingDir      varchar(255),
    @CommandFile     varchar(50)
AS

DECLARE @SQL varchar(1000)

--Since we want to echo the output, we need to replace some special characters
select @FTPServer = replace(replace(replace(@FTPServer, '|', '^|'),'<','^<'),'>','^>')
select @FTPUser = replace(replace(replace(@FTPUser, '|', '^|'),'<','^<'),'>','^>')
select @FTPPWD = replace(replace(replace(@FTPPWD, '|', '^|'),'<','^<'),'>','^>')
select @FTPPath = replace(replace(replace(@FTPPath, '|', '^|'),'<','^<'),'>','^>')

SELECT @SQL= 'echo ' + 'open ' + @ServerName + ' > ' + @WorkingDir + @CommandFile
exec master..xp_cmdshell @SQL

SELECT @SQL= 'echo ' + @UserName + '>> ' + @WorkingDir + @CommandFile
exec master..xp_cmdshell @SQL

SELECT @SQL= 'echo ' + @Password + '>> ' + @WorkingDir + @CommandFile
exec master..xp_cmdshell @SQL

SELECT @SQL= 'echo ' + 'put ' + @SourcePath + @SourceFile + ' ' + @FilePath + @FileName + ' >> ' + @workdir + @workfilename
exec master..xp_cmdshell @SQL

SELECT @SQL= 'echo ' + 'quit' + ' >> ' + @WorkingDir + @CommandFile
exec master..xp_cmdshell @SQL

SELECT @cmd = 'ftp -s:' + @WorkingDir + @CommandFile

CREATE TABLE #tempTable (ID INT IDENTITY(1,1), [Command] varchar(1000))
insert #tempTable
exec master..xp_cmdshell @SQL

select ID, ouputtmp = [Command] from #tempTable


@CommandFile parameter accepts a text file that will have the FTP command to execute

For example

open myftp.ftp.com
testuser
testpass
put c:\temp\payroll.csv payroll.csv
quit

Remember, xp_cmdshell is disabled by default. You can enable it by running the following script.

RECONFIGURE
GO
sp_configure 'xp_cmdshell', 1
GO
RECONFIGURE
GO

You can call this stored procedure in this way...

EXEC sp_FTP
    @ServerName = 'myftp.ftp.com' ,
    @UserName   = 'testuser' ,
    @Password   = 'testpass' ,
    @FilePath   = '' ,
    @FileName   = 'payroll.csv' ,
    @SourcePath = 'C:\temp\' ,
    @SourceFile = 'payroll.csv' ,
    @WorkingDir = 'C:\temp\',
    @CommandFile = 'FTPCommand.txt'


Although not ideal, this is a nice little feature that you can use via xp_cmdshell to FTP files.

Thank you.

Tuesday, March 6, 2012

Using BCP command to create a CSV file from SQL Server

Today, we will review BCP client utility and XP_CMDSHELL to extract information from SQL Server into a csv file. Suppose you have a punch processing application which is used by employees to clock in and clock out. This information is stored in a database. Every night a SQL Server agent job runs which selects all the payroll hours for that day and extract into a csv file, saving it to a network location. The file can then be imported into a payroll processing application such as ADP.

In this article, we will review generating and extracting the csv file to a network location. In future post we will extend this further to FTP the file to a remote FTP Server.

So, let's get started.

1. Create a stored procedure that can be run as a step 1 in a SQL Agent Job.

CREATE PROC GetPayrollPunches
  AS
     BEGIN
                SELECT E.FirstName,E.LastName,P.Hours 
                FROM Employees E INNER JOIN 
               PayrollHours P ON E.EmployeeID = P.EmployeeID
    END
 GO

2. Create a BCP command as a second step in SQL Agent Job.

DECLARE @FileName varchar(50)
DECLARE @Command varchar(2000)

SET @FileName = 'C:\temp\payroll.csv'
SET @Command = 'bcp "EXEC tempdb..GetPayrollPunches" queryout ' + @FileName + '-t -c -T -S MyServer\SQL2008'
--Print (@Command)
EXEC master..xp_cmdshell @Command
GO

Note, you only have to pass server name when server is not default instance or you are running the utility from a different machine.

Switches
  • -c output in ASCII
  • -t  override field terminator with "," (instead of default tab)
  • -T use a trusted connection. You can pass -U and -P for username and password instead.
  • -S Server name. If the SQL Server is detault instance, you don't have to pass this parameter.
By default, xp_cmdshell is not enabled. You can enable it using the following command..

RECONFIGURE
GO
sp_configure 'xp_cmdshell', 1
GO
RECONFIGURE
GO

BCP is a nice little utility to export data into a file format from SQL Server. I personally don't think this is a very elegant solution. Ideally, there should be an application to run the stored procedure, retrieve the data, and save it out. But, the functionality is there if you need it.

Thank you.


Friday, March 2, 2012

SQL Server Statistics

When you run a SQL Query, SQL Engine has to choose the best path to execute that query. It can opt for a table scan, i.e. scanning entire table to determine the result set. It can look at the indexes to determine the best way to retrieve the data or it can use statistics information it collects to execute the query. The goal is to minimize the query execution time for faster data retrieval and minimal data locking.

Statistics allow SQL Server to keep information about the number of records in a table, page density, histogram and any available indexes to determine the best path to execute a requested query.

Starting from SQL Server 2000, all versions have ways to collect necessary information and create / update statistics, provided this feature is on (it is on by default) and for the most part you don't have to do anything.

You can also manually create / update statistics.

Implicit Statistics Creation and Update
When automatic statistics creation and update is enabled (default is on), anytime you execute a query with a WHERE or JOIN clause with a condition column, the statistics is automatically updated or created if necessary.

Manually Create and Update Statistics
You can also manually create / drop / update statistics with either the default sampling rate or your own desired sampling rate.

Let's use an example to check when the statistics is automatically created and then manually create statistics.

--Create a new Table in Temp database

USE TempDB
GO
CREATE TABLE Customers
(
   CustomerID INT IDENTITY,
   FirstName varchar(50),
   LastName varchar(50),
   EmailAddress varchar(255),
   PhoneNumber varchar(15)
)
GO

--Let's insert some records
INSERT INTO Customers(FirstName,LastName,EmailAddress,PhoneNumber)
VALUES('Jane','Doe','janed@email.com','404-111-1111')

INSERT INTO Customers(FirstName,LastName,EmailAddress,PhoneNumber)
VALUES('John','Doe','johnd@email.com','404-111-1111')

INSERT INTO Customers(FirstName,LastName,EmailAddress,PhoneNumber)
VALUES('Sara','Lee','saral@email.com','404-222-2222')

INSERT INTO Customers(FirstName,LastName,EmailAddress,PhoneNumber)
VALUES('Chris','Smith','csmith@email.com','404-333-3333')

INSERT INTO Customers(FirstName,LastName,EmailAddress,PhoneNumber)
VALUES('Shania','Rogers','sr@email.com','404-444-4444')

GO

--now lets check if there is any statistics on this table
sp_helpstats N'Customers', 'ALL'
GO

--Following message is displayed
--This object does not have any statistics or indexes.

--Now run a query
SELECT * FROM Customers WHERE LastName='Lee'
GO
--check statistics again
sp_helpstats N'Customers', 'ALL'
GO

--following message is displayed
statistics_namestatistics_keys
_WA_Sys_00000003_0CBAE877LastName
--If you create an index on this table, it will also automatically create statistics. CREATE NONCLUSTERED INDEX ix_Email ON Customers(EmailAddress) GO --check statistics again sp_helpstats N'Customers', 'ALL' GO --Query Analyzer will now display following message
statistics_namestatistics_keys
_WA_Sys_00000003_0CBAE877LastName
ix_EmailEmailAddress
--Let's create an statistic manually CREATE STATISTICS stat_Name ON Customers(FirstName,LastName) -- multicolumn GO --check statistics again sp_helpstats N'Customers', 'ALL' GO --Query Analyzer will now display 3 statistics
statistics_namestatistics_keys
_WA_Sys_00000003_0CBAE877LastName
ix_EmailEmailAddress
stat_NameFirstName, LastName
--If you want to know what columns are part of statistics and also the range as well density, --you can run the following DBCC command. DBCC SHOW_STATISTICS (N'Customers', ix_Email) GO --You can also also define a sample size when creating a script. --For example, in the above create statistics you can --also pass the same size. CREATE STATISTICS stat_Name ON Contact(FirstName,LastName) WITH SAMPLE 75 PERCENT GO --While a larger sample size is better, because it will result --in faster query execution, but large sample also means statistics --creation will take longer because engine has to scan the table more. --To drop a statistic, you have to provide object name.statistics name DROP STATISTICS Customers.stat_Name GO --As I mentioned previously, by default SQL Server --automatically creates and updates statistics. --You can turn auto scanning off or on by running the following query ALTER DATABSE <yourDBName> SET AUTO_CREATE_STATISTICS OFF GO ALTER DATABSE <yourDBName> SET AUTO_CREATE_STATISTICS ON GO

There have been several improvements in this area in SQL Server 2008 and you rarely have to do anything with them, but choices are available should you need them.

Thank you.